Category: Windows XP


If your PC / laptop is taking ages to shut down/reboot, there are multiple areas that we need to focus on in checking to identify the root cause and fix it permanently. In this post I am going to show you the common areas to look at when you are in such situations.


First thing to start with is to fire up the Task manager and identify the resource utilization from the moment you initiate shutdown/reboot. Speaking in context with Windows 8 and 10 versions, launching Task manager will land you at Processes tab by default unless you chose fewer details; if so, click on more details and this will land you at Processes tab. Here key areas to look at is CPU, Memory and Disk processes.

Active programs accessed during your session are generally accessed using Physical memory (RAM) and the other passive/minimized programs will be moved off to page file based on RAM utilization and availability. So, in our case, active programs data we accessed needs to be written off to Disk to commit the tasks we performed just before hitting that shutdown/reboot buttons/commands.


CPU, Memory & Disk resource utilization are heavily dependent on the programs those you accessed during your session and background programs those run as part of OS/software requirements.  Considering an example, I have launched VMware workstation program which consumed about 56GB of my RAM for its operations. Closing the program will not immediately free up used 56 GB of RAM, because the program itself has child processes that needs memory accessed data be written off/committed to the Disk to save the programs state I have left it at.

See below screenshot for your reference:

This is Resource monitor tool (type “resmon” in command prompt to fire this thing up), from this utility you can further check the resource utilizing processes. Take a look at the screenshot above, though the memory usage has come down to 4%, the disk still has read write operations going on it. Sort with “Total (B/sec)” in descending order to see which process is performing operations on disk. In my case VMware workstation uses .vmem files to hold the physical memory of my machine to give those physical RAM resources to Virtual machines I use within the application. Once I shutdown/suspend those VMs running on VMware workstation application, the RAM utilized by the VMs must be saved to disk on .vmem file. This process takes time based on amount of RAM utilized by each VM – the larger VM memory configuration/utilized, the longer time it takes to commit the data off to disk.


Similarly, there are multiple child processes/background tasks that runs in the back-end and until those tasks are completed, the system will not shutdown/reboot. These tasks do not appear on “Shutdown preventing programs” because they are actively working to close the session data. There are a lot of other tools we can use to identify the processes those consuming resources, but the first step to start off is with resource monitor.


I will keep adding more information on this topic, but if you have any queries feel free to comment and I will try to address them.


Cheers!

Chaladi


Some of the IT people overlook this SID attribute of a machine forgetting the importance of unique SID/GUID requirements.

1. Try creating a clone of VM in Hyper-V or VMware Workstation and have them in Workgroup and see if you can enable communication between two clones
2. Try join the same clone VMs into Lab based domain and see how it goes
3. With domain user accounts added in the VM’s Lusrmgr.msc, post AD join and logging into VM with one of AD account and then demoting VM from domain, and then try to do a sysprep with domain accounts still there in local user accounts, and see if you can run sysprep successfully

Please do this Labwork and comment your results…

Just a sneak peak at the SID error…

sid-err-crp


Hello, this post gonna be simple and straight – About ESET Smart security. This post should help get you fix that connectivity issues; you were trying to establish a remote desktop session to your desktop/laptop at your home from internet, remotely. You might be using Static Public IP or best utilizing that Dynamic IP with the DDNS services (comment if you would like to see how to use DDNS service to get into your home computer RDP).

For some reasons, ESET isn’t allowing the MSTSC application/3389 port white-listing when you manually setting this up in Advanced settings Or maybe let me put it this way, when you setup the port/mstsc application traffic white-listing, it isn’t working as expected :(. So, firewall Interactive mode to the rescue.

It is very important that you stop all the Internet activity on your Home computer, to avoid getting multiple questions asked by the ESET for network communication. Example: Web browsing and other computer activity stoppage should help you avoid random questions being asked.

ESET Smart Security

ESET Smart Security

Click on “Setup” of ESET smart security and then “Enter Advanced Setup” -> Expand “Network”  And then Click on “Personal Firewall” and then change the Filtering mode to “Interactive mode” and then click “OK”

ESET - 1

Now try to initiate the Remote desktop from Internet to your computer, and then you will get a pop-up in ESET asking if you want to allow or Deny MSTSC.EXE application traffic. Click on Allow, and then once done establishing the session to your computer, change the ESET Firewall settings to “Automatic mode” from “interactive mode”

This helps you avoid answering all the network communications filtering questions again.


Thanks for flying with Chaladi.me 🙂


I have been haunted by this weird TCP spurious retransmissions and TCP DUP ACK issue since past 1 month – It almost started/I’ve noticed on November last week. Our production FTP server is a Red Lion device See here sitting in our manufacturing site, whereas our source servers are hosted on Hyper-V clusters. This setup has no Firewalls; only Cisco Nexus Switches 3064  & 3048 Models – that’s 3 3064’s and 2 3048 models connected in a HA model. Our Hyper-V clusters are connected to Cisco 3064 Switches in HA model; 2 Nic cables pulled from each VM Host to 2 3064 Switches for HA. Red Lion – FTP/HTTP device has been attached to 3048 model. These 3064’s are connected to the 3048 Switches directly – no firewalls.

STP is configured properly and running A-okay. Other than Red Lion device, I was able to route traffic as desired and can reach data transfer rates at 250 MB/s. But if this same Red Lion device is moved and connected to a different network that’s having Cisco Catalyst switches, this Device is working fine. No retransmissions issue.

There are a lot of packet retransmissions happening just before the FTP application failing with error – BTW, I am using Filezilla client to transfer data to the FTP Box. Same is the case when browsing the FTP/HTTP site hosted on the Red Lion box via IE from my machines.

TCP_Retransmissions

Wireshark Analysis

I’ve analysed the network connection between these servers in question and noticed that there are a lot of packet retransmissions happening. TCP “RST” (RESET), “Spurious Retransmissions” (Source Retransmitted the packet even though the DEST ACK; assuming the DEST hasn’t ACK) are noticed in high numbers. This is not the case when I tried to capture traffic between the other sources.

TCP RST couldn’t be considered as the issue normally because this happens after every session closure. But in our case the packet retransmissions and failing communication are resetting the RPC port communication and thus these messages are seen. So obviously, in both success and failure cases we will see this kind of messages.

TCP Segment Length

TCP Segment Length

I have noticed that the Maximum Segment Size; MSS of the destination server – Redlion box is “1280” and the source server is “1460”. Pinging with 1460 without fragmentation to the destination server which has 1280 MSS value is responding fine; data that remote server responds with has same data length size – “data.len>1460” filter applied shows that ICMP data of 1460 is transmittable both ways. Both the source and destination servers acknowledged to communicate using 1280 MSS value as they should be per application protocols standards; verified this as per “tcp.len>1200” filter applied and could see traffic generated has no TCP segment length that is using higher segment size than 1280 size in the application communications and thus eliminating the possible MSS size issue for packet retransmissions.

portqry

Port Query Results

ICMP packets are fine, they don’t have any issues. Only FTP/HTTP traffic is getting affected. This means no issues until Network layer, but with Application/session layer the traffic is getting worse. And at times the Portqry too failing with Filtered messages on port 21 from Source to destination FTP box.

Right now I am doubting the Speed/duplex settings on these switches and VM Hosts. Our VM Hosts are 10G capable NICs and Switches too. It is hard-coded in Nexus switches regarding speed at VM Hosts interface, so technically switches are controlling the speed, so I got nothing to do on VM Hosts speed/duplex settings; anything I want to modify is left with Nexus switch.  End device Red Lion FTP box is only 100 MB Capable. Cannot blame if source talking at full 10 Gig speed and end device is failing to respond with same speed. Because the normal SYNC, ACK communication too getting affected with the TCP retransmissions; at this same time, I cannot assume this couldn’t be the reason. It still needs analysis to rule out things.

Worked with Cisco and they say Nexus switches don’t support buffering, so 10 Gig source and 100 MB destination don’t work in the nexus environment. Buffering is not capable they say in Nexus switches. An alternative they propose to fix is to update the IOS on these Nexus switches; but that’s tentative solution.


—— Update on 23rd Jan 2016—–

<<We’ve updated the Nexus IOS version to the latest, yet we see the same issues. Still banging head to get this fixed.>>


I will keep on updating this thread as more progress is made… Comments are welcome.


Cheers!

Chaladi


Hey thought to blog this to help some of the patrons who are facing issues while mounting NFS fileshare on their windows servers/desktops.

Note: Only Windows 7/8/8.1 Enterprise editions have “Services for NFS” in Turn Windows Features on/off settings.

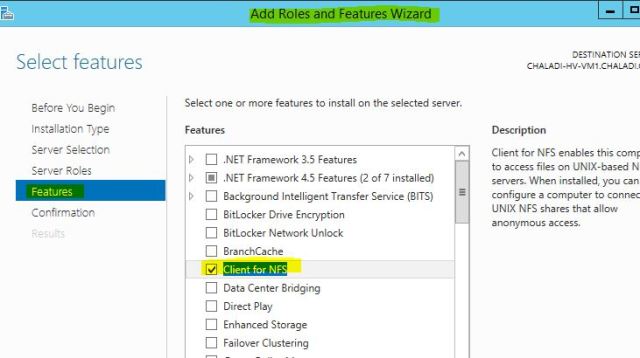
In Windows Server 2008/R2/2012/R2 editions you have to enable Client for NFS feature to get this issue fixed/to mount NFS fileshares in windows OS. Follow below steps to get this fixed.

NFS Fileshare Error


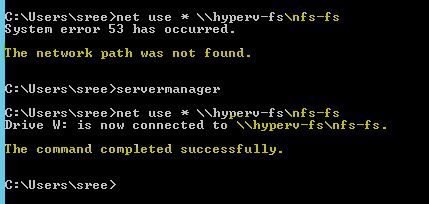
To mount NFS fileshare, you can either use net use command or mount command. “mount” command works only if NFS client is installed 🙂

Server Manager


Launch Server Manager to install NFS client features.

Turn NFS Client Feature

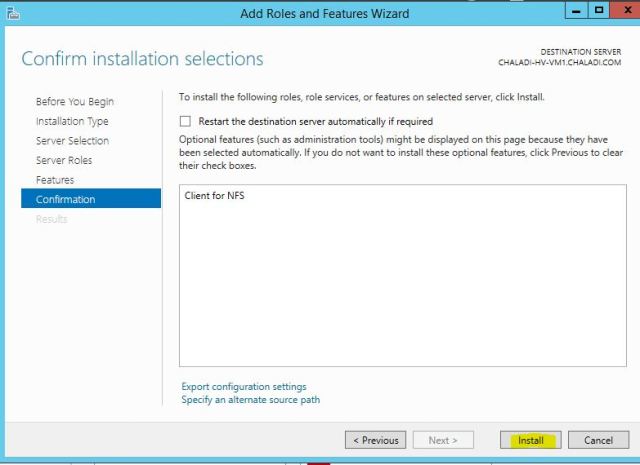
Install NFS Feature

Install Success

NFS mount Success

Once Client for NFS is installed, the command works instantly without any reboots.

Let me know if you have any questions/issues getting NFS work.


Background:

I faced this issue a year ago and now just realized that there can be guys out there struggling/looking for the solution. Basically the problem is: We are not able to reach any Terminal/Remote Apps hosted on our Terminal/Remote App Server or any services are explicitly failing to reach via network.

Note: This applies to Problems with Firewall getting  disabled by GPOs automatically.

Situation 1:

Well, that basically narrows down us to Firewall, but even if we enabled/Disabled firewall with Rules defined, the applications are not getting connected or Remote desktop fails too.

Situation 2:

We see that Firewall is getting disabled or enabled as per Domain GPO Policy and for this we were not getting succeeded even if the firewall rules were defined, but able to get through firewall for sometime after the firewall is enabled/disabled manually on the server.

Resolution:

For this kinda problem we are very sure that Firewall is to be blamed here, but we have put our efforts on Firewall and still not getting us through because of GPO policies. The solution is to look at the Firewall policies Profiles that’s defined on the server:

We have to configure Firewall Profiles that will explicitly coordinate with the GPOs. For this you have to configure Windows firewall from SECPOL.MSC or WF.MSC and configure the Windows Profiles as below listed.


For the Organisation, since it would have Domain Network and possibility of Private you can configure these both profiles, and if your Organisation has Public network configured configure the same as well.

WINDOWS-FIREWALL

You configure Domain, Public and Private Profiles and enable Traffic to flow through Firewall enabled for Inbound and Outbound connections. You do the same for three profiles and say it okay, as per requirements. Now even if the Domain GPO forces this server to get the Firewall disabled, the applications and services can be reached out without any problems.


This applies to Problems where Firewall is getting  disabled by GPOs.


I knew lot of patrons are looking forward for this post, however at the same time some were already educated about this.  But, this post will be real benefit for patrons who are keen to improve their Windows performances and increase system response time and decrease system load timings.

Lot of general Windows users tend to delete temp, %TMP% and PREFETCH files to see if that action does anything they were expecting. Well, the news is, that really doesn’t help much, but I must admit that, it is the Real First Step you should consider doing, when you felt that your Windows is slow. What really that does is: deleting the tmp, %TMP%, and Prefetch files frees up the some portion of your RAM Cache Memory and Windows Partition Disk space. You can start with these approaches, but you should continue the remaining steps to control your Windows completely about it’s performance.

You type the below commands and Delete the Items listed there. Use SHIFT+DELTE Combinations to delete permanently items from your computer.

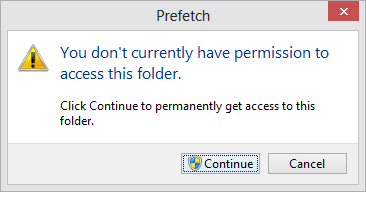
temp tmp prefetch prefetch2Remember that to Access Prefetched Items in your Windows, You need Admin Rights. And as you can Imagine, this deletes the temporary files and files those were ready to access files for some applications will be cleared off. But that really does no help in performance improvement, where in some cases the Applications those relying on temp files and prefetched files will load up slow to get all the DATA again from the applications data from hard disk and put on into RAM for access.

So, to get the real benefit from performance improvement, follow the rest steps below.

You really should use MSCONFIG to suppress some of the Applications and services those put System Start-up pressures and eventually runs in the background unnecessarily eating much of your Valuable RAM. So, what MSCONFIG really does is, it will give control to handle, which applications are allowed along with system starts and which will not.

msconfig

Once you hit Enter in your Command prompt with MSCONFIG typed, this Dialog Box opens up. The Services Tab in there will list the services which will be started up whilst Windows Boots up!. Remember that, the Dialog box initially loads with Normal Startup as the Startup Selection, what you need to do is, you should select the Selective Startup Radio Button and Navigate to Services and Startup Tabs in Dialog Box presented.

msconfig 3msconfig services

Here, the Services which were presented are allowed to start at Windows Load times. What you really need to do is, Untick the services which were not part of Microsoft Services; tick the Hide All Microsoft Services and Isolate the services to start at System Loads. Remember this window is representing the Windows 8 settings and Windows 7 or xp or vista are real similar, except the Startup Items are moved to Task manager in Windows 8 and 7 and previous Windows Versions remain same, having control in the same MSCONFIG settings.

msconfig 2

Look at the above Picture, I have hidden all the Microsoft Services, to not to accidentally disable any Windows sort of Services, allowing myself to not to boot into system with required services disabled. :0 Here I have disabled lot of services except Apple Bonjour and Apple Mobile Device; where These are required for iTunes to detect your iPhone or iPad when you connect to your Computer. Other Few services I allowed here are ExpressCache, where cache improves my startup times and ESET is my antivirus programme, which shall not be disabled; any antivirus program shall not be disabled to protect PC.
msconfig startupThe above image tells that to handle the startup items, we need to use task manager and restrict the applications from starting up. See the below images.

win8 startupSo, I have navigated to Windows 8 task manager to handle the Application startup restrictions. In Windows 7 and Vista, 7 the MSCONFIG will present you the same options there. Here you need to carefully disable the Applications those were not really useful. For example, here in the above image I have disabled all the applications except Windows Host Process, Realtek HD Audio Manager and igfxtray applications, however you can disable the Igrfxtray as well, but remember to not to disable the Windows required applications.

You can also, increase your System Performance by moving you SWAP file aka PAGE file from your Windows Disk to Another DIsk (I said Different Disk, not Different Partition. Remember, moving to another partition doesn’t help you). See the below Screenshots on how to change the SWAP file settings. Here i have not moved the Page File to different Disk, because I don’t have any, rather I manually controlled the Virtual Memory of Windows Drive, where you can increase the Virtual Memory as you desire instead of Windows handling it to 2 Times RAM. These VM settings can be accessed through System Properties-> Advanced System Settings-> Advanced Tab-> Performance settings -> Advanced Tab then on and Selecting the Virtual Memory Settings in the Advanced Window Opened. And then Untick the Automatically Manage Paging file Size for all drives and select Drive you were interested and select Custom Size and increase the value as you desire.
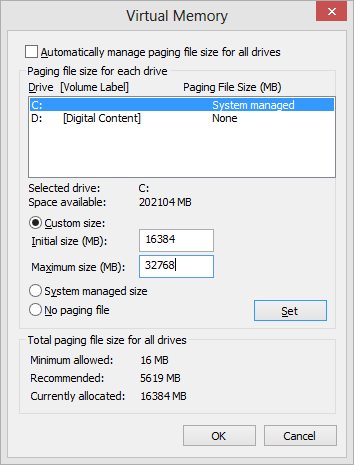
VM Settings

And once these steps are implemented, the next steps to Do is to handle the Windows System Settings to disable some Graphical settings to get most out of our PC.

Go to your Computer and Select system Properties. – Right click on Windows and Select Properties from the Context Menu, which will take you to the System Info Dialog Box. See the below Screenshot:
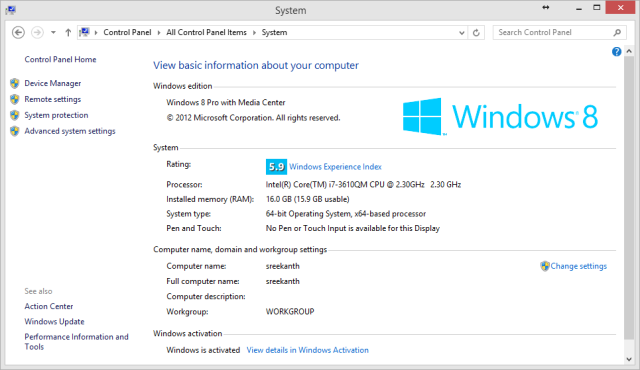
System Settings screenAnd then Click on Advanced System Settings here in this Windows and Go to Advanced Tab from the Window Opened. From there, Click on Performance Settings Button, which will take you to the Performance Options Windows with Visual Effects Tab selected. Click on Adjust from best Performance from there and select those you were really interested. What this does is, discouraging the Windows to use Graphical Representation and saves some RAM for us. Here I have not changed anything, because my Windows is Perfectly A-OK with 16 Gigs of RAM and Tuneup UP and running for me (oh! what is tuneup? Look at this post finish lines)

performance settings

Now, Finally these steps will put you in lot better standings than earlier. Reboot and See if these changes have improved your Windows performance.

You can/might use CCCleaner sort of things for improvements. But My favorite part is here it comes… The Tuneup Utilities Application. I love this literally and I really encourage to use it for real performance improvements.

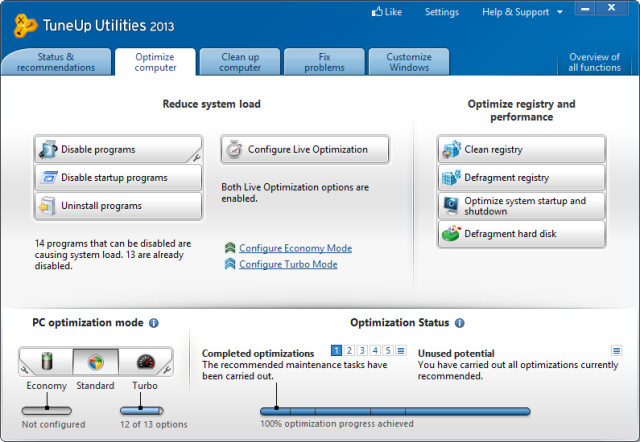
tuneup

tuneup 2

Remember to Answer all the Tuneup Asked questions to best improve the performance. It will handle all the Registry cleaning, Defragmenting,  Disabling Application background processes and Hell lot of others… It will really pull out all the potential your Windows Has.

Thank you for your real Patience, going through all these hell lot of wordings.

Cheers! CHALADI


Recently I have came across this annoying error: Identity source cannot be added in vsphere Web client interface via SSO configuration to add Active Directory to be my Identity Source for Users authentication in my vSphere 5.1 Platform.

LDAP-error-49

The issue is Very straight-forward if you have read the Error description with patience; Authentication issue: Provided Credentials are not valid error. However, the Administrator account seems to be accurate with the password, but still throws this error. IN such cases try the below steps to isolate the issue straight away.

Steps:

1- Make sure the Administrator Password is Correct and it hasn’t changed since last known.

2- Make sure the Administrator account is a member of Domain Administrator account: Will be default, if Default Admin account is being used.

3- If everything is failing, Try using a different Account, whereby promoting/creating a Domain Admin Account and providing the same.

Once the valid credentials are provided, Identity source can be added without fail this time.

You may also encounter, LDAPS security error, where in The Domain Environment, the rejection of normal LDAP protocol is set via Group Policies. In such cases, you should use LDAPS protocol to connect to AD Source and use the certificate of LDAP security. See the below links about the LDAPS error.

http://kb.vmware.com/selfservice/microsites/search.do?language=en_US&cmd=displayKC&externalId=2035934

Video: How to add Identity Source in vSphere 5.1 via Webclient


Hi All, Yet another Blog post about solving the Obtaining IP Address and Authenticating issues with the Mobile phones, that’s keep looping the same error whilst connecting to Connectify Hotspot On your Laptop/Desktop.

The First basic thing is to allow Firewall to accept the Program traffic. For example Connectify Services like Connectifyd, ConnectifyNetworkService and Connectify service programs has to be allowed though Windows Advanced Firewall settings. This can be achieved as seen in the below screenshots.

You access Advanced Firewall Properties using Control Panel, and then System and Security and then Firewall Settings, there in the Left hand Panel you see advanced settings like shown in the below screenshots.

advancedfirewall connectifyinbound

As you can see the program is allowed in the inbound properties, and the same has to be done with the Outbound traffic as well. If your Firewall is being managed by thirdparty softwares like My Application do, then you have to configure settings at the Thirdparty software side.

I am using ESET Smart Security 6 for the firewall Protection, so, if yours is of same, watch this Video, on how to create new Zone Rules to allow Connectify or any other program or service or network that is explicitly Being rejected by ESET for communication.

So, watch this video and solve your connectify issues or related network issues with the ESET Smart Security.

Hope this helps!


There can be cases, where when you try to join your client computer to a Domain, it gets authenticated with the Domain Access rights, but Throws error saying “Network Location Cannot Be Reached ”

Microsoft KB says: Enable the TCP/IP Netbios Helper Service  in Services.msc.  But if that service is already up and running, then that KB is invalid.


Follow this procedure to isolate the issue straight away. See the below screenshots for precise referencing.

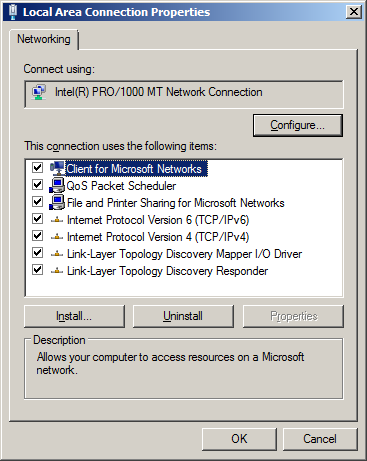
Enable all the protocols for the Network Adapter you are trying to establish the Connection to the Domain.  enable all the Protocols like Link layer topology and others as seen in the 2nd screenshot.


chaladi-lan adapter Network Location Cannot be Reached - solution