Tag Archive: ics


Update: USB OTG Helper application will solve NTFS formatted USB Drives to be mounted on phone. THis is available in XDA forums only as of yet!


This is to notify the solution for How to fix the external SD cards mounting issues on windows 7 in Jelly bean or related Android OS.

Jelly Bean Home Screen

If you have came from ICS or GB flavors, the probability is that you have used your file exploreres within your Device to see the Exernal SD card (Micro SD here) and Internal sd card (USB Storage) in an easy ways, representing external Sd card folder and usb storage folders in their respective denomination; an easy navigation, not much confusion isn’t it?.

But ever since JB arrived, the storage devices location are little changed; perhaps accurate this time if get used to; are mounted in “/storage” path as /sdcard0 representing internal USB storage space and /sdcard1 representing microsd card
Another path /USBdisk is for the OTG (On the GO USB cable attached flash drives can be seen there in this path folder.) natively supports FAT/FAT32 formatted USB Flash drives, if NTFS support is needed, try you luck with NTFS Mounter. So, since this path has been changed, some already existing Softlinks (shortcuts in windows context) target to that sdcards.

I can put down a lot of words here, but the solution is important however; for most people, so confining with thus stated information. Since the above mentioned words help for some people who are looking for sdcard locations within their Phone; who confused seeing the external sd card folder empty :-0.
So how to fix mounting issues in windows 8, 7 or Vista is, here: just install Multi Mount SD card from Market or from your known sources and that’s it. You will see the sd cards mounted on your PC and at the same time you can access SD cards on your Phone as well. Try not use the Other methods, when using Multi Mount SD method. use Widget on your screen to activate and deactivate application aka Mounting and Unmounting Disk drives.

Hope this helps some irated patrons.


Hi,

In This post, I came forward with a solution for WI-FI connectivity issues on Samsung galaxy SII, where the WI-FI switching is taking too long time to turn on.

I have faced the same problem and been to number of forums; XDA First off and blogs and tried several, though it didn’t worked for me, the motivation lead me to find an alternative way, which will surely work.

First Try, Going to Flight Mode and then Coming Back To Normal Mode, this works major times, If not happy with this process, go ahead with this process… flashing kernel. because the problem is with the drivers that are not properly coordinating with the System Boards. So let’s workaround that way

I have reflashed my Kernel with New latest Siyah Kernel 3.5.2. I am writing this in context of galaxy SII – I9100 Users only and Must be rooted your phone. If you don’t know rooting, you probably can’t try this to fix your issue.

Try flashing your kernel from your CWM manager within your phone or from ODIN tool Either from computer or from your phone having ODIN installed. I recommend CWM, as the flashing process is smooth and goes good. Download the below mentioned files and place the extracted zImage file in your phone and flash em…

Download the Below Files, Any One, as per your procedure requirements


DOWNLOAD TAR (for Odin)

DOWNLOAD ZIP (for CWM Recovery) – This is for CWM process.

Download this and extract the files from ZIP folder and copy the zImage file in your sdcard location and open the CWM and flash the Kernel, Not the ROM. Be careful, to flash the kernel with this zImage only, If other images are there in the same directory move them, or move this file to new folder, where you can easily recognize the image file location.

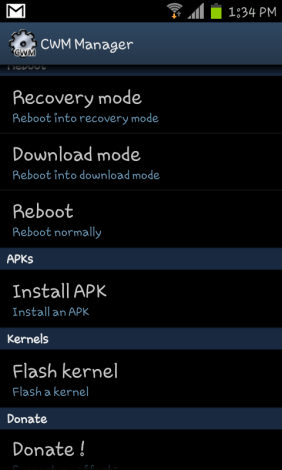
CWM MANAGER

From this, you can see, the flash kernel option is available. However since, this is CF-ROOTED and CWM is managed through CF-KERNEL, the flashing of ROM option has been disabled, once the siyah kernel has been flashed for kernel. I respect the Chain Fire however, until new stable WI-FI working kernel is released, I am sticking with Siyah Kernel, as I can use the Dual ROMs now…

Okay. So concisely, Flash your kernel with this latest stable Working Siyah Kernel, You can be on Whatever ROM version, Flash this and See the issues fixed.

For queries or if clarifications is needed with this writing, revert back to me, I am happy to furnish the details.

If not fixed, or facing problems, mention the problems here, and I will be working at my best to fix them for you.


Please Note: This is applicable for Rooted Android Devices Only. Rooting your android device allows you to utilise your android device hidden features and full capabilities. Note that; rooting your device will void warranty and is not recommended, if you are facing problems with your Device performance or its system, where likely your device needs to be sent to supplier for warranty covered service needs.

This is intended for educational purpose only. Having your Device rooted and installed with the latest version of Titanium Backup Pro, you can perform application specific backups and restores. The main benefits using Titanium backup is:

  Titanium Backup Icon

      • You can perform application specific backups, for about 50 backups history, allowing you to restore any of the 50 history backups.
      • You control your applications fully and is a way to protect your application data integrity. For example, your Temple run coin collection is up there at 20000 and all of sudden, your friends, spent them all for unnecessary purchases and stupid avatars, you are very unlikely to hold your scolding; in such situations Titanium to the rescue.
      • Another very good reason is, you are backing up your application and the data, so you don’t have to install this application from market or from other links to have this application in your new, device. The Titanium allows you to install the application along with the data restored.
      • And there’s lot to say about this App, but confining with the most interesting points, the screenshots allows you to have a good look at the application usage and insider views

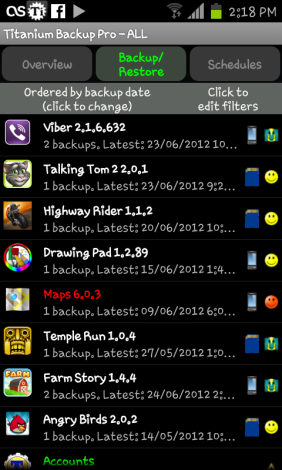
Once you are in the Titanium Application, all you have to do is to navigate to the Viber; in this case or any application you would lie to preserver and back it up! If the settings are not touched; the preferences I mean, you are backing up the application and data too, so you can just trust this application to save your viber messages and in future, if you wanted to install the viber on another device and wanted to see the messages in there, Titanium to the rescue.

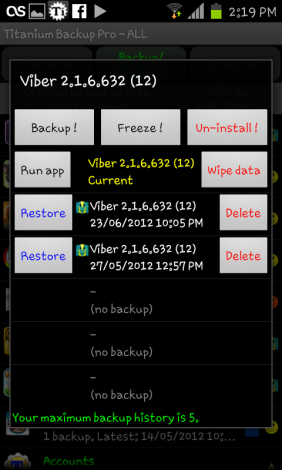
Here are some screenshots, telling you the insider views:

 ImageImage

 So Back up your private, precious messages and transfer them to your another preferred device, or just preserve for future use

Once, you backup your application, the history is shown for the app, once you navigate to the interested application, you can restore to that particular date, from the backups taken shown with the date took that.

By default the Titanium Backup folder is created within the device for Samsung Galaxy Devices, and you have to ensure that folder location is secure and is accessible for you to back it up to the computer to transfer the same to another device for restoring the data. The most common place is within the Device memory, identified with the Titanium Backup Folder as named, and all the application and data backups are stored there. You have to copy that folder, or if you need specific application, you have ensure you transfer all the relying files for that application and transfer them to the new device, titanium backup folder; in order to show it up in the new device Titanium Backup application. Once you have the application identified in the Titanium, one click does it all, restoring your messages to the new device.

Important relying files within Titanium Backup Folder: Ensure you backup all these files, excluding the date of the data backups, can be easily identified with the date modified property.