Category: How To


In Windows 8 / 10 versions, launching the File explorer places you in Quick access window instead of legacy “My Computer/This PC”. This post will help you to configure the File explorer to open up “This PC” instead of quick access, so your requirement is fulfilled.

Launch File explorer which land you into quick access window as below:


Quick Access

Right click on the “Quick access” as below to launch the Options menu.

Settings


Change the Option “Open File Explorer to:” to This PC from drop down menu. Click on Apply and hit OK. This will configure the file explorer to launch This PC instead of Quick access.


We’re gonna solve the DHCP server authorization issue in this post. Error code looks like below:

“The authorization of DHCP Server failed with Error Code: 20070. The DHCP service couldn’t contact Active Directory.”

dhcp-post-config-20070 error

This is possibly due to user permissions on AD. Ensure you input Domain Administrator (DA) Credentials in the DHCP Commit dialog box, instead of proceeding with logged in account. There are chances that though you logged into DC using some user credentials, it doesn’t necessarily mean you are DA/EA. It could just be an account Admin locally, but not on Domain/forest. Check the DA user in ADUC and ensure you input those credentials to solve this.

Other things you should try if the credentials are DA is, ensure AD services are up and running. Check launching ADUC, Try Restarting DHCP Server services, Try re-installing DHCP from server manager. If you still encounter any issues, please message here, so we can further look into it to get it resolved.

Cheers!
Chaladi


Hello, this post gonna be simple and straight – About ESET Smart security. This post should help get you fix that connectivity issues; you were trying to establish a remote desktop session to your desktop/laptop at your home from internet, remotely. You might be using Static Public IP or best utilizing that Dynamic IP with the DDNS services (comment if you would like to see how to use DDNS service to get into your home computer RDP).

For some reasons, ESET isn’t allowing the MSTSC application/3389 port white-listing when you manually setting this up in Advanced settings Or maybe let me put it this way, when you setup the port/mstsc application traffic white-listing, it isn’t working as expected :(. So, firewall Interactive mode to the rescue.

It is very important that you stop all the Internet activity on your Home computer, to avoid getting multiple questions asked by the ESET for network communication. Example: Web browsing and other computer activity stoppage should help you avoid random questions being asked.

ESET Smart Security

ESET Smart Security

Click on “Setup” of ESET smart security and then “Enter Advanced Setup” -> Expand “Network”  And then Click on “Personal Firewall” and then change the Filtering mode to “Interactive mode” and then click “OK”

ESET - 1

Now try to initiate the Remote desktop from Internet to your computer, and then you will get a pop-up in ESET asking if you want to allow or Deny MSTSC.EXE application traffic. Click on Allow, and then once done establishing the session to your computer, change the ESET Firewall settings to “Automatic mode” from “interactive mode”

This helps you avoid answering all the network communications filtering questions again.


Thanks for flying with Chaladi.me 🙂


Hello All,


I have gone really crazy with this irritating “The page at CBOX.WS says” popup for some websites I have visited and I found it very painful browsing through those sites, as the alert fires every 30-60 seconds when the web page is opened that contains this popup script.


The page at says screen

The above error screen cap says all. Even though the OK button clicked for gods sake, it doesn’t return us any values or stops there, it fires again after about minute time if the webpage is kept opened and even if we are active on that page.


For this to get fixed, install Adblock Plus extension for Google Chrome from Here and follow the below steps:

Go to ABP Options settings, that can be accessed as below, or go to Extensions from Menu of the chrome and Then Tools and then Extensions; this is located as 3 Bars placed next to URL space.

ABP Options Menu


Then Navigate as below and follow the instructions per screenshots to get you save from this annoying popup alert:


ABP Options Adding CBOX.WS CBOX Added to ABP


From the above steps, the CBOX alert can be supressed. And this can be applied to any such popups those irritating us. This basically blocks the websites we have added to filter list, thus suppressing the alert thereby.

Cheers!

Chaladi


Hello All, It’s time for a little Biz Talk…

BizTalk Internal Error

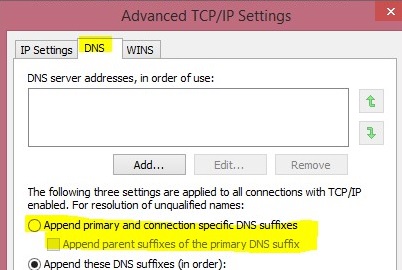
Gone through this error recently and I wanted to blog this so that users who might face this kind of issue are relieved. From the above error; what’s the main issue cause cannot be so easily guessable or displayed for quick resolution approach for a system admin. The primary cause for this kind of error is name resolution between BizTalk and SQL servers. We have to ensure that the name resolution is proper between Web/BizTalk and SQL servers. Check the ping results from Web to SQL for FQDN (Fully Qualified Domain Name; example.test.com) and DNS Name only(example) of the SQL server, and be assured that proper reach of the right server is seen in this case. And ensure in the NIC settings of SQL server that DNS suffix is not specified particularly to any other domains, or  for safe side the domain this SQL server resides can be mentioned, however not required when auto register option is selected.

DNS Suffix Settings

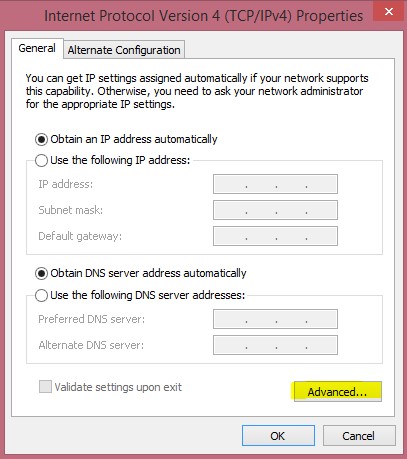
For this settings to check, Go to Network Connections; which can be opened via NCPA.CPL command and then open the Network Interface which is the connection interface between WEB and SQL nodes talk and then Go to properties of the Ethernet adapter and click on TCP/IP 4 version and click on properties again to have this accessed.

2 4

6

Then Ensure the above tick boxes are there for this NIC to have a proper name resolution in the network.

This must solve the case of name resolution between nodes for proper communication. Reach me out if you have any queries regarding this case.


Cheers!

Chaladi


Background:

I faced this issue a year ago and now just realized that there can be guys out there struggling/looking for the solution. Basically the problem is: We are not able to reach any Terminal/Remote Apps hosted on our Terminal/Remote App Server or any services are explicitly failing to reach via network.

Note: This applies to Problems with Firewall getting  disabled by GPOs automatically.

Situation 1:

Well, that basically narrows down us to Firewall, but even if we enabled/Disabled firewall with Rules defined, the applications are not getting connected or Remote desktop fails too.

Situation 2:

We see that Firewall is getting disabled or enabled as per Domain GPO Policy and for this we were not getting succeeded even if the firewall rules were defined, but able to get through firewall for sometime after the firewall is enabled/disabled manually on the server.

Resolution:

For this kinda problem we are very sure that Firewall is to be blamed here, but we have put our efforts on Firewall and still not getting us through because of GPO policies. The solution is to look at the Firewall policies Profiles that’s defined on the server:

We have to configure Firewall Profiles that will explicitly coordinate with the GPOs. For this you have to configure Windows firewall from SECPOL.MSC or WF.MSC and configure the Windows Profiles as below listed.


For the Organisation, since it would have Domain Network and possibility of Private you can configure these both profiles, and if your Organisation has Public network configured configure the same as well.

WINDOWS-FIREWALL

You configure Domain, Public and Private Profiles and enable Traffic to flow through Firewall enabled for Inbound and Outbound connections. You do the same for three profiles and say it okay, as per requirements. Now even if the Domain GPO forces this server to get the Firewall disabled, the applications and services can be reached out without any problems.


This applies to Problems where Firewall is getting  disabled by GPOs.


I knew lot of patrons are looking forward for this post, however at the same time some were already educated about this.  But, this post will be real benefit for patrons who are keen to improve their Windows performances and increase system response time and decrease system load timings.

Lot of general Windows users tend to delete temp, %TMP% and PREFETCH files to see if that action does anything they were expecting. Well, the news is, that really doesn’t help much, but I must admit that, it is the Real First Step you should consider doing, when you felt that your Windows is slow. What really that does is: deleting the tmp, %TMP%, and Prefetch files frees up the some portion of your RAM Cache Memory and Windows Partition Disk space. You can start with these approaches, but you should continue the remaining steps to control your Windows completely about it’s performance.

You type the below commands and Delete the Items listed there. Use SHIFT+DELTE Combinations to delete permanently items from your computer.

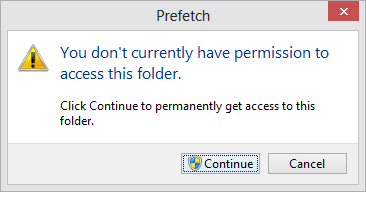
temp tmp prefetch prefetch2Remember that to Access Prefetched Items in your Windows, You need Admin Rights. And as you can Imagine, this deletes the temporary files and files those were ready to access files for some applications will be cleared off. But that really does no help in performance improvement, where in some cases the Applications those relying on temp files and prefetched files will load up slow to get all the DATA again from the applications data from hard disk and put on into RAM for access.

So, to get the real benefit from performance improvement, follow the rest steps below.

You really should use MSCONFIG to suppress some of the Applications and services those put System Start-up pressures and eventually runs in the background unnecessarily eating much of your Valuable RAM. So, what MSCONFIG really does is, it will give control to handle, which applications are allowed along with system starts and which will not.

msconfig

Once you hit Enter in your Command prompt with MSCONFIG typed, this Dialog Box opens up. The Services Tab in there will list the services which will be started up whilst Windows Boots up!. Remember that, the Dialog box initially loads with Normal Startup as the Startup Selection, what you need to do is, you should select the Selective Startup Radio Button and Navigate to Services and Startup Tabs in Dialog Box presented.

msconfig 3msconfig services

Here, the Services which were presented are allowed to start at Windows Load times. What you really need to do is, Untick the services which were not part of Microsoft Services; tick the Hide All Microsoft Services and Isolate the services to start at System Loads. Remember this window is representing the Windows 8 settings and Windows 7 or xp or vista are real similar, except the Startup Items are moved to Task manager in Windows 8 and 7 and previous Windows Versions remain same, having control in the same MSCONFIG settings.

msconfig 2

Look at the above Picture, I have hidden all the Microsoft Services, to not to accidentally disable any Windows sort of Services, allowing myself to not to boot into system with required services disabled. :0 Here I have disabled lot of services except Apple Bonjour and Apple Mobile Device; where These are required for iTunes to detect your iPhone or iPad when you connect to your Computer. Other Few services I allowed here are ExpressCache, where cache improves my startup times and ESET is my antivirus programme, which shall not be disabled; any antivirus program shall not be disabled to protect PC.
msconfig startupThe above image tells that to handle the startup items, we need to use task manager and restrict the applications from starting up. See the below images.

win8 startupSo, I have navigated to Windows 8 task manager to handle the Application startup restrictions. In Windows 7 and Vista, 7 the MSCONFIG will present you the same options there. Here you need to carefully disable the Applications those were not really useful. For example, here in the above image I have disabled all the applications except Windows Host Process, Realtek HD Audio Manager and igfxtray applications, however you can disable the Igrfxtray as well, but remember to not to disable the Windows required applications.

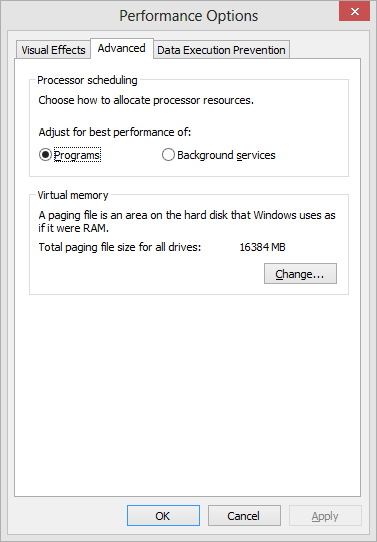
You can also, increase your System Performance by moving you SWAP file aka PAGE file from your Windows Disk to Another DIsk (I said Different Disk, not Different Partition. Remember, moving to another partition doesn’t help you). See the below Screenshots on how to change the SWAP file settings. Here i have not moved the Page File to different Disk, because I don’t have any, rather I manually controlled the Virtual Memory of Windows Drive, where you can increase the Virtual Memory as you desire instead of Windows handling it to 2 Times RAM. These VM settings can be accessed through System Properties-> Advanced System Settings-> Advanced Tab-> Performance settings -> Advanced Tab then on and Selecting the Virtual Memory Settings in the Advanced Window Opened. And then Untick the Automatically Manage Paging file Size for all drives and select Drive you were interested and select Custom Size and increase the value as you desire.
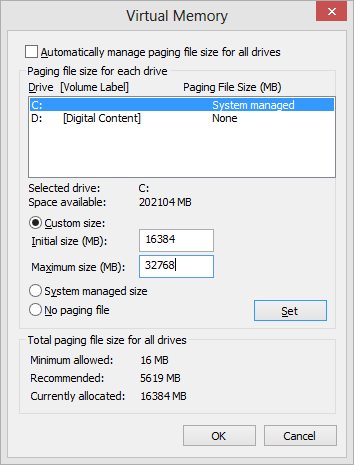
VM Settings

And once these steps are implemented, the next steps to Do is to handle the Windows System Settings to disable some Graphical settings to get most out of our PC.

Go to your Computer and Select system Properties. – Right click on Windows and Select Properties from the Context Menu, which will take you to the System Info Dialog Box. See the below Screenshot:
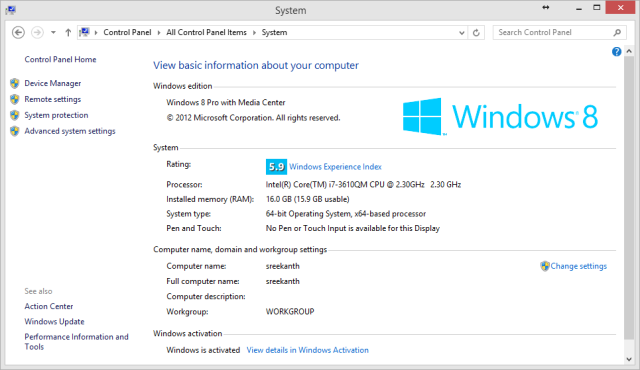
System Settings screenAnd then Click on Advanced System Settings here in this Windows and Go to Advanced Tab from the Window Opened. From there, Click on Performance Settings Button, which will take you to the Performance Options Windows with Visual Effects Tab selected. Click on Adjust from best Performance from there and select those you were really interested. What this does is, discouraging the Windows to use Graphical Representation and saves some RAM for us. Here I have not changed anything, because my Windows is Perfectly A-OK with 16 Gigs of RAM and Tuneup UP and running for me (oh! what is tuneup? Look at this post finish lines)

performance settings

Now, Finally these steps will put you in lot better standings than earlier. Reboot and See if these changes have improved your Windows performance.

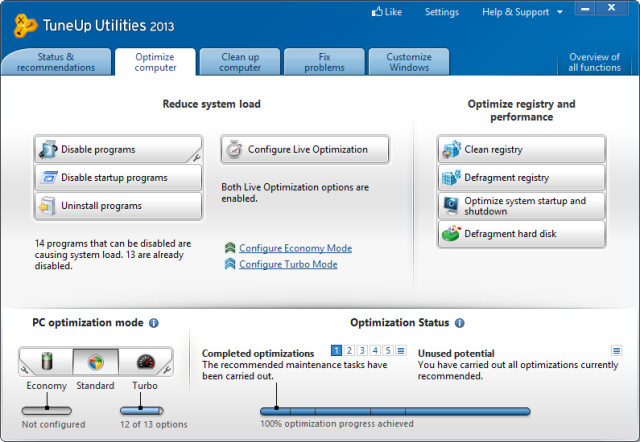
You can/might use CCCleaner sort of things for improvements. But My favorite part is here it comes… The Tuneup Utilities Application. I love this literally and I really encourage to use it for real performance improvements.

tuneup

tuneup 2

Remember to Answer all the Tuneup Asked questions to best improve the performance. It will handle all the Registry cleaning, Defragmenting,  Disabling Application background processes and Hell lot of others… It will really pull out all the potential your Windows Has.

Thank you for your real Patience, going through all these hell lot of wordings.

Cheers! CHALADI


Update: Create a partition specifically for Virtual RAM if you are still facing any lags. Separate disk would do much better, but only PCs has this feasibility.

Generally the visibility of disk usage is seen in Task Manager and more info at Resource Monitor. The issue can be of different sources, but that has to be dealt carefully before applying this sort of approach, because each issues has its fix and this issue is tracked so that appropriate solution is implemented. Note: For windows 8, this has become a common issue and mostly this can be your solution too and be informed about the issue source too.

For the fix; Change the Virtual Memory settings from Automatic System Managed To Custom Sizes, and Set Minimum To RAM Equivalent. For clear Step-By-Step Instructions, see below screenshots.

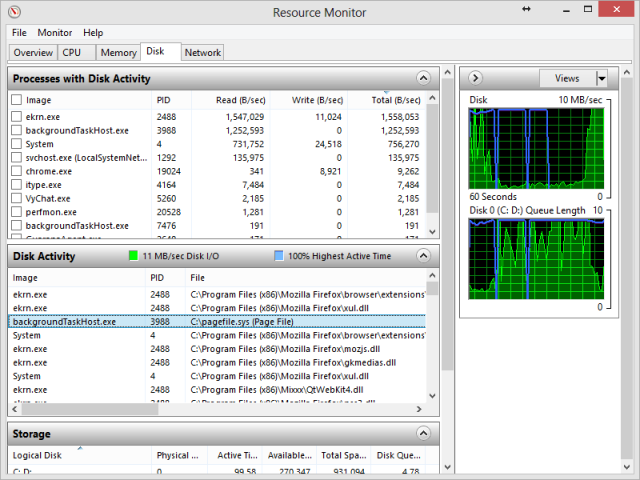
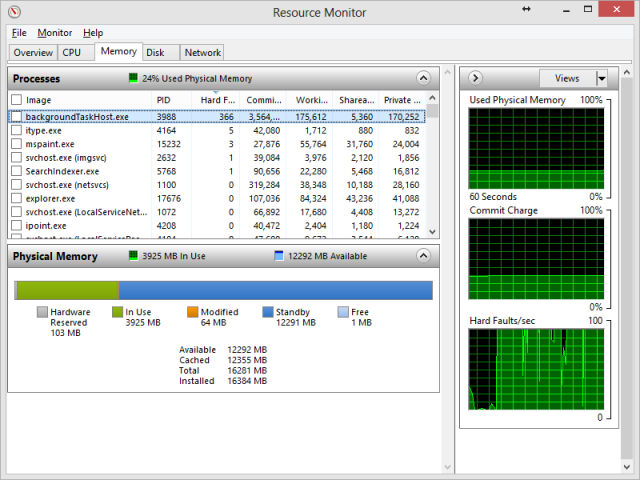
First off, Take a closer look at Resource Monitor Tool: Use RESMON command in CMD Prompt: And look there, in Disk Activity, the Read (B/Sec) is aligned in High to Low order, so that Highest Read rates Process are visible. Here, BackGroundTaksHost.exe is using Read rates from Disk consistently and is Locked out to fix the issue with Virtual Memory, since the Source process is initiated by Pagefile.sys file.

High_Disk_usage

Some times, the RAM may be, at 100% usage, but for that Virtual Memory is not the issue, but can be at some times. However for such issues too, look at the Memory Tab in RESMON and identify the key issue maker. Here BackGroundTaskHost.exe is having more HardFaults than any, which is an issue with RAM processing. Sometimes RAM consistent usage is noticed for some users, however the Processes that’s using at boot starts are the one’s those to be blamed. For now to solve Disk Usage issue, Proceed to the next step, leaving Memory set aside.
RAM USAge

Now, go to system properties of your computer.

System Settings screen

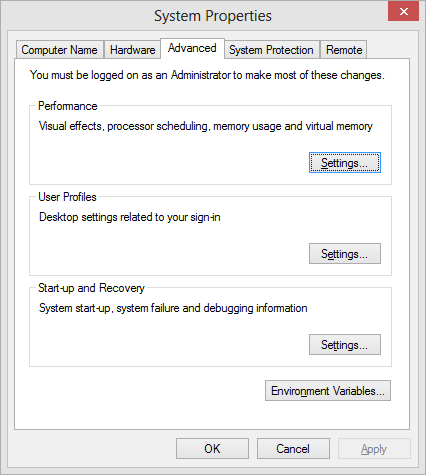
Click on the Advanced System Settings, visible in the Left Hand-side Column.  And go to Advanced Tab in the Properties Dialog Box. and then click Settings Button on Performance Options.

system properies

Now, Click on Advanced Tab and Proceed to Virtual Memory Options menu and click on change button. And set the RAM amount there, Minimum = Your RAM Size in MB and Maximum = Twice or Thrice as you wish.

performance options

VM Settings

So, that’s it! Set it up! and Reboot the System to see the changes. And watch out the task manager after reboot, to see if the changes are made and success for us.

Cheers!


Recently I have came across this annoying error: Identity source cannot be added in vsphere Web client interface via SSO configuration to add Active Directory to be my Identity Source for Users authentication in my vSphere 5.1 Platform.
LDAP-error-49

The issue is Very straight-forward if you have read the Error description with patience; Authentication issue: Provided Credentials are not valid error. However, the Administrator account seems to be accurate with the password, but still throws this error. IN such cases try the below steps to isolate the issue straight away.

Steps:

1- Make sure the Administrator Password is Correct and it hasn’t changed since last known.

2- Make sure the Administrator account is a member of Domain Administrator account: Will be default, if Default Admin account is being used.

3- If everything is failing, Try using a different Account, whereby promoting/creating a Domain Admin Account and providing the same.

Once the valid credentials are provided, Identity source can be added without fail this time.

You may also encounter, LDAPS security error, where in The Domain Environment, the rejection of normal LDAP protocol is set via Group Policies. In such cases, you should use LDAPS protocol to connect to AD Source and use the certificate of LDAP security. See the below links about the LDAPS error.

http://kb.vmware.com/selfservice/microsites/search.do?language=en_US&cmd=displayKC&externalId=2035934

Video: How to add Identity Source in vSphere 5.1 via Webclient


Hey There! Happy news for the HTC One Indian Users; HTC has released the Android Update 4.2.2 in India that was ever since waiting for. Releasing for countries one after another; India got it’s chance for Software update after UK tasted it. So, if you aren’t aware of this Update, go a head and Install.

Here’s some screenshots I took whilst updating my Phone.

So, if thinking about what new features this Update will bring to you? Look at the Screenshot 2: Concisely Zoe Updated; new media format added, new themes added, AE/AF lock feature, Quick settings from status bar, and… See them in real. Give it a try if on Stable Internet speed.

Bug Fix Update - Prior 4.2.2 Update 4.2.2 Update Screen Downloading 4.2.2 Status Verifying Downloaded Package Install Package 4.2.2 4.2.2 Updated

General Problems/Issues Whilst INstallation:
 
Q-> Cannot see Updates listed
A-> Please be on a stable Internet Speed. Not 2G, be 3G or 512Mbps speed.
 
Q-> Update failed, cannot extract Package
A-> The downloaded Package is corrupt, please re download the package with Phone restarted after error shows up. And please be advised that You are on Strong internet speed to Download a non corrupted File. Since the file weighs about 437 MB, a strong internet speed will help download the file without any Checksums failure.
 
Q->After Update my Phone stuck at Boot.
A-> please allow atleast for 20 Minutes for the update process to be completed. If still the phone stucks at boot, Please do a hard reset with the Power buttons. Plug to PC USB cable to make it work for some cases.
 
Q-> Argh! enough, I got all new features. So, Quiet!
A-> Great! Cheers!