Category: General Information


We’re gonna solve the DHCP server authorization issue in this post. Error code looks like below:

“The authorization of DHCP Server failed with Error Code: 20070. The DHCP service couldn’t contact Active Directory.”

dhcp-post-config-20070 error

This is possibly due to user permissions on AD. Ensure you input Domain Administrator (DA) Credentials in the DHCP Commit dialog box, instead of proceeding with logged in account. There are chances that though you logged into DC using some user credentials, it doesn’t necessarily mean you are DA/EA. It could just be an account Admin locally, but not on Domain/forest. Check the DA user in ADUC and ensure you input those credentials to solve this.

Other things you should try if the credentials are DA is, ensure AD services are up and running. Check launching ADUC, Try Restarting DHCP Server services, Try re-installing DHCP from server manager. If you still encounter any issues, please message here, so we can further look into it to get it resolved.

Cheers!
Chaladi


I have been haunted by this weird TCP spurious retransmissions and TCP DUP ACK issue since past 1 month – It almost started/I’ve noticed on November last week. Our production FTP server is a Red Lion device See here sitting in our manufacturing site, whereas our source servers are hosted on Hyper-V clusters. This setup has no Firewalls; only Cisco Nexus Switches 3064  & 3048 Models – that’s 3 3064’s and 2 3048 models connected in a HA model. Our Hyper-V clusters are connected to Cisco 3064 Switches in HA model; 2 Nic cables pulled from each VM Host to 2 3064 Switches for HA. Red Lion – FTP/HTTP device has been attached to 3048 model. These 3064’s are connected to the 3048 Switches directly – no firewalls.

STP is configured properly and running A-okay. Other than Red Lion device, I was able to route traffic as desired and can reach data transfer rates at 250 MB/s. But if this same Red Lion device is moved and connected to a different network that’s having Cisco Catalyst switches, this Device is working fine. No retransmissions issue.

There are a lot of packet retransmissions happening just before the FTP application failing with error – BTW, I am using Filezilla client to transfer data to the FTP Box. Same is the case when browsing the FTP/HTTP site hosted on the Red Lion box via IE from my machines.

TCP_Retransmissions

Wireshark Analysis

I’ve analysed the network connection between these servers in question and noticed that there are a lot of packet retransmissions happening. TCP “RST” (RESET), “Spurious Retransmissions” (Source Retransmitted the packet even though the DEST ACK; assuming the DEST hasn’t ACK) are noticed in high numbers. This is not the case when I tried to capture traffic between the other sources.

TCP RST couldn’t be considered as the issue normally because this happens after every session closure. But in our case the packet retransmissions and failing communication are resetting the RPC port communication and thus these messages are seen. So obviously, in both success and failure cases we will see this kind of messages.

TCP Segment Length

TCP Segment Length

I have noticed that the Maximum Segment Size; MSS of the destination server – Redlion box is “1280” and the source server is “1460”. Pinging with 1460 without fragmentation to the destination server which has 1280 MSS value is responding fine; data that remote server responds with has same data length size – “data.len>1460” filter applied shows that ICMP data of 1460 is transmittable both ways. Both the source and destination servers acknowledged to communicate using 1280 MSS value as they should be per application protocols standards; verified this as per “tcp.len>1200” filter applied and could see traffic generated has no TCP segment length that is using higher segment size than 1280 size in the application communications and thus eliminating the possible MSS size issue for packet retransmissions.

portqry

Port Query Results

ICMP packets are fine, they don’t have any issues. Only FTP/HTTP traffic is getting affected. This means no issues until Network layer, but with Application/session layer the traffic is getting worse. And at times the Portqry too failing with Filtered messages on port 21 from Source to destination FTP box.

Right now I am doubting the Speed/duplex settings on these switches and VM Hosts. Our VM Hosts are 10G capable NICs and Switches too. It is hard-coded in Nexus switches regarding speed at VM Hosts interface, so technically switches are controlling the speed, so I got nothing to do on VM Hosts speed/duplex settings; anything I want to modify is left with Nexus switch.  End device Red Lion FTP box is only 100 MB Capable. Cannot blame if source talking at full 10 Gig speed and end device is failing to respond with same speed. Because the normal SYNC, ACK communication too getting affected with the TCP retransmissions; at this same time, I cannot assume this couldn’t be the reason. It still needs analysis to rule out things.

Worked with Cisco and they say Nexus switches don’t support buffering, so 10 Gig source and 100 MB destination don’t work in the nexus environment. Buffering is not capable they say in Nexus switches. An alternative they propose to fix is to update the IOS on these Nexus switches; but that’s tentative solution.


—— Update on 23rd Jan 2016—–

<<We’ve updated the Nexus IOS version to the latest, yet we see the same issues. Still banging head to get this fixed.>>


I will keep on updating this thread as more progress is made… Comments are welcome.


Cheers!

Chaladi


Hello All,


I have gone really crazy with this irritating “The page at CBOX.WS says” popup for some websites I have visited and I found it very painful browsing through those sites, as the alert fires every 30-60 seconds when the web page is opened that contains this popup script.


The page at says screen

The above error screen cap says all. Even though the OK button clicked for gods sake, it doesn’t return us any values or stops there, it fires again after about minute time if the webpage is kept opened and even if we are active on that page.


For this to get fixed, install Adblock Plus extension for Google Chrome from Here and follow the below steps:

Go to ABP Options settings, that can be accessed as below, or go to Extensions from Menu of the chrome and Then Tools and then Extensions; this is located as 3 Bars placed next to URL space.

ABP Options Menu


Then Navigate as below and follow the instructions per screenshots to get you save from this annoying popup alert:


ABP Options Adding CBOX.WS CBOX Added to ABP


From the above steps, the CBOX alert can be supressed. And this can be applied to any such popups those irritating us. This basically blocks the websites we have added to filter list, thus suppressing the alert thereby.

Cheers!

Chaladi


I knew lot of patrons are looking forward for this post, however at the same time some were already educated about this.  But, this post will be real benefit for patrons who are keen to improve their Windows performances and increase system response time and decrease system load timings.

Lot of general Windows users tend to delete temp, %TMP% and PREFETCH files to see if that action does anything they were expecting. Well, the news is, that really doesn’t help much, but I must admit that, it is the Real First Step you should consider doing, when you felt that your Windows is slow. What really that does is: deleting the tmp, %TMP%, and Prefetch files frees up the some portion of your RAM Cache Memory and Windows Partition Disk space. You can start with these approaches, but you should continue the remaining steps to control your Windows completely about it’s performance.

You type the below commands and Delete the Items listed there. Use SHIFT+DELTE Combinations to delete permanently items from your computer.

temp tmp prefetch prefetch2Remember that to Access Prefetched Items in your Windows, You need Admin Rights. And as you can Imagine, this deletes the temporary files and files those were ready to access files for some applications will be cleared off. But that really does no help in performance improvement, where in some cases the Applications those relying on temp files and prefetched files will load up slow to get all the DATA again from the applications data from hard disk and put on into RAM for access.

So, to get the real benefit from performance improvement, follow the rest steps below.

You really should use MSCONFIG to suppress some of the Applications and services those put System Start-up pressures and eventually runs in the background unnecessarily eating much of your Valuable RAM. So, what MSCONFIG really does is, it will give control to handle, which applications are allowed along with system starts and which will not.

msconfig

Once you hit Enter in your Command prompt with MSCONFIG typed, this Dialog Box opens up. The Services Tab in there will list the services which will be started up whilst Windows Boots up!. Remember that, the Dialog box initially loads with Normal Startup as the Startup Selection, what you need to do is, you should select the Selective Startup Radio Button and Navigate to Services and Startup Tabs in Dialog Box presented.

msconfig 3msconfig services

Here, the Services which were presented are allowed to start at Windows Load times. What you really need to do is, Untick the services which were not part of Microsoft Services; tick the Hide All Microsoft Services and Isolate the services to start at System Loads. Remember this window is representing the Windows 8 settings and Windows 7 or xp or vista are real similar, except the Startup Items are moved to Task manager in Windows 8 and 7 and previous Windows Versions remain same, having control in the same MSCONFIG settings.

msconfig 2

Look at the above Picture, I have hidden all the Microsoft Services, to not to accidentally disable any Windows sort of Services, allowing myself to not to boot into system with required services disabled. :0 Here I have disabled lot of services except Apple Bonjour and Apple Mobile Device; where These are required for iTunes to detect your iPhone or iPad when you connect to your Computer. Other Few services I allowed here are ExpressCache, where cache improves my startup times and ESET is my antivirus programme, which shall not be disabled; any antivirus program shall not be disabled to protect PC.
msconfig startupThe above image tells that to handle the startup items, we need to use task manager and restrict the applications from starting up. See the below images.

win8 startupSo, I have navigated to Windows 8 task manager to handle the Application startup restrictions. In Windows 7 and Vista, 7 the MSCONFIG will present you the same options there. Here you need to carefully disable the Applications those were not really useful. For example, here in the above image I have disabled all the applications except Windows Host Process, Realtek HD Audio Manager and igfxtray applications, however you can disable the Igrfxtray as well, but remember to not to disable the Windows required applications.

You can also, increase your System Performance by moving you SWAP file aka PAGE file from your Windows Disk to Another DIsk (I said Different Disk, not Different Partition. Remember, moving to another partition doesn’t help you). See the below Screenshots on how to change the SWAP file settings. Here i have not moved the Page File to different Disk, because I don’t have any, rather I manually controlled the Virtual Memory of Windows Drive, where you can increase the Virtual Memory as you desire instead of Windows handling it to 2 Times RAM. These VM settings can be accessed through System Properties-> Advanced System Settings-> Advanced Tab-> Performance settings -> Advanced Tab then on and Selecting the Virtual Memory Settings in the Advanced Window Opened. And then Untick the Automatically Manage Paging file Size for all drives and select Drive you were interested and select Custom Size and increase the value as you desire.

VM Settings

And once these steps are implemented, the next steps to Do is to handle the Windows System Settings to disable some Graphical settings to get most out of our PC.

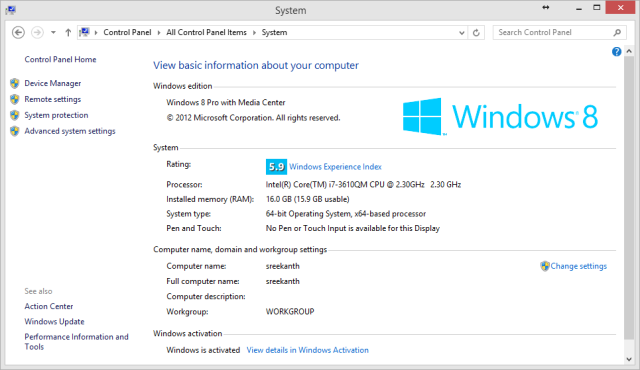
Go to your Computer and Select system Properties. – Right click on Windows and Select Properties from the Context Menu, which will take you to the System Info Dialog Box. See the below Screenshot:

System Settings screenAnd then Click on Advanced System Settings here in this Windows and Go to Advanced Tab from the Window Opened. From there, Click on Performance Settings Button, which will take you to the Performance Options Windows with Visual Effects Tab selected. Click on Adjust from best Performance from there and select those you were really interested. What this does is, discouraging the Windows to use Graphical Representation and saves some RAM for us. Here I have not changed anything, because my Windows is Perfectly A-OK with 16 Gigs of RAM and Tuneup UP and running for me (oh! what is tuneup? Look at this post finish lines)

performance settings

Now, Finally these steps will put you in lot better standings than earlier. Reboot and See if these changes have improved your Windows performance.

You can/might use CCCleaner sort of things for improvements. But My favorite part is here it comes… The Tuneup Utilities Application. I love this literally and I really encourage to use it for real performance improvements.

tuneup

tuneup 2

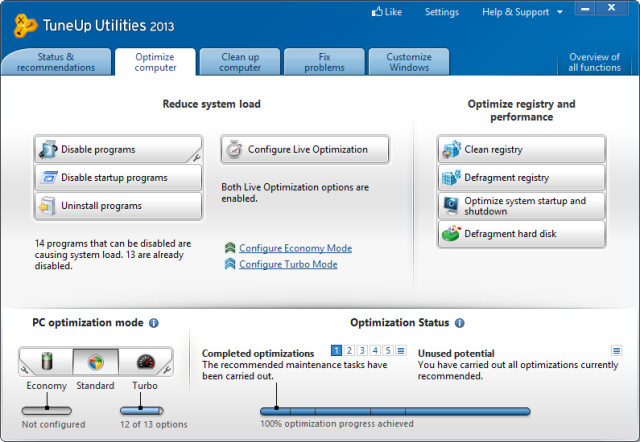
Remember to Answer all the Tuneup Asked questions to best improve the performance. It will handle all the Registry cleaning, Defragmenting,  Disabling Application background processes and Hell lot of others… It will really pull out all the potential your Windows Has.

Thank you for your real Patience, going through all these hell lot of wordings.

Cheers! CHALADI


Hey Guys! Have you recently visited the ESET website? Well, now the Antivirus and Enterprise Security Organisation Website gt hacked by some Palestinians; popular KDMS team did that and I managed to Grab a Video of that for future reference purposes.

I knew, for lot this doesn’t seems useful, but for future reference and for case studies, I am blogging this. Maybe some might get this useful. Here’s the Video grabbed:

Cheers! Chaladi \(--)/


Update: Create a partition specifically for Virtual RAM if you are still facing any lags. Separate disk would do much better, but only PCs has this feasibility.

Generally the visibility of disk usage is seen in Task Manager and more info at Resource Monitor. The issue can be of different sources, but that has to be dealt carefully before applying this sort of approach, because each issues has its fix and this issue is tracked so that appropriate solution is implemented. Note: For windows 8, this has become a common issue and mostly this can be your solution too and be informed about the issue source too.

For the fix; Change the Virtual Memory settings from Automatic System Managed To Custom Sizes, and Set Minimum To RAM Equivalent. For clear Step-By-Step Instructions, see below screenshots.

First off, Take a closer look at Resource Monitor Tool: Use RESMON command in CMD Prompt: And look there, in Disk Activity, the Read (B/Sec) is aligned in High to Low order, so that Highest Read rates Process are visible. Here, BackGroundTaksHost.exe is using Read rates from Disk consistently and is Locked out to fix the issue with Virtual Memory, since the Source process is initiated by Pagefile.sys file.

High_Disk_usage

Some times, the RAM may be, at 100% usage, but for that Virtual Memory is not the issue, but can be at some times. However for such issues too, look at the Memory Tab in RESMON and identify the key issue maker. Here BackGroundTaskHost.exe is having more HardFaults than any, which is an issue with RAM processing. Sometimes RAM consistent usage is noticed for some users, however the Processes that’s using at boot starts are the one’s those to be blamed. For now to solve Disk Usage issue, Proceed to the next step, leaving Memory set aside.
RAM USAge

Now, go to system properties of your computer.

System Settings screen

Click on the Advanced System Settings, visible in the Left Hand-side Column.  And go to Advanced Tab in the Properties Dialog Box. and then click Settings Button on Performance Options.

system properies

Now, Click on Advanced Tab and Proceed to Virtual Memory Options menu and click on change button. And set the RAM amount there, Minimum = Your RAM Size in MB and Maximum = Twice or Thrice as you wish.

performance options

VM Settings

So, that’s it! Set it up! and Reboot the System to see the changes. And watch out the task manager after reboot, to see if the changes are made and success for us.

Cheers!


Hi All, Yet another Blog post about solving the Obtaining IP Address and Authenticating issues with the Mobile phones, that’s keep looping the same error whilst connecting to Connectify Hotspot On your Laptop/Desktop.

The First basic thing is to allow Firewall to accept the Program traffic. For example Connectify Services like Connectifyd, ConnectifyNetworkService and Connectify service programs has to be allowed though Windows Advanced Firewall settings. This can be achieved as seen in the below screenshots.

You access Advanced Firewall Properties using Control Panel, and then System and Security and then Firewall Settings, there in the Left hand Panel you see advanced settings like shown in the below screenshots.

advancedfirewall connectifyinbound

As you can see the program is allowed in the inbound properties, and the same has to be done with the Outbound traffic as well. If your Firewall is being managed by thirdparty softwares like My Application do, then you have to configure settings at the Thirdparty software side.

I am using ESET Smart Security 6 for the firewall Protection, so, if yours is of same, watch this Video, on how to create new Zone Rules to allow Connectify or any other program or service or network that is explicitly Being rejected by ESET for communication.

So, watch this video and solve your connectify issues or related network issues with the ESET Smart Security.

Hope this helps!


[UPDATED POST with New Software Links]

Quick way around for recovery:

1. Copy “media” folder that contains all the folder, which contains all the .slm and .slt files, in “gallery_lock” folder in your sd card.
2. open application in your phone.
3. go to settings.
4. select “recovering locked media”.
5. select “detail recovery”.
6. tap on “recovery”.
7. you’ll find all the files recovered in “locked/safe photos”.

———————-Original Post ——————————–

Note: This also Applies to corrupted Photos and any Image File extensions. You can easily recover Corrupted, Damaged Photos with this Method.

Credit: Thanks to Rahul Mahawar for sending across the SLM and SLT files to work on them.

SLM Files

I was asked by many of my Blog Visitors about the SLM file recovery methods. I am very much sorry that I took so much long time to respond with the solution, just because I was bit busy and out of station, to be able to see comments and work on this much demanding Post.

First off, SLM stands for Media File, SLT stands for Thumb nail. So, Thumb nail can be recovered easily with the File extension change technique, however the original Photo; SLM cannot be recovered with the simple File extension changes. So, follow this awesome method to recover all your SLM files to revert back to Original Photos.

[UPDATE – 17-09-2015] Better alternative to PIXRECOVERY Software. Use Stellar Phoenix JPEG Recovery Software to recover multiple SLM Images at once. Test it using below Torrent link. Ensure you buy software once happy with the test results.

Stellar Phoenix Torrent Link

Alternatively you can use old PIXRECOVERY method if interested.

Download PIXRECOVERY SOFTWARE from torrent sites: Full version is available there at KAT.PH Click the left hand Link to visit torrent site . Please Note, I am not encouraging you to use Pirated software, Just navigating you to Use the software before you buy it, for confidence on Software you purchase it prior. If happy with purchase prior testing, you can navigate to this website and Buy it or download a Demo version as well: http://www.officerecovery.com/pixrecovery/

Once downloaded DEMO, or Installed FULL version of PIX RECOVERY. OPEN the PIX recovery and Click on Recover Menu. See below images:

In Either Stellar software or Pixrecovery software recovery methods, you’ll have to rename the SLM File to .JPEG to get image loaded into software. Please Change the View options from Windows Explorer settings in case you have difficulty renaming the file extension – shown below:

Folder Options - Show File Extensions

Folder Options - Full

—-> Must Do – Change the SLM file extensions to JPG   <—- and then open it up in PIX recovery software and it will process automatically the images with individual folders created for IMAGES recovered. The safest way and fastest way recovering corrupted or encoded Images.

Note: SLT is not required to recover SLM files, You can copy and paste all the SLM files to computer and change the SLM file extensions to JPG and start recovering process then on…

PixRecovery_Success_1

Open Pix Recovery Files 1

Change the SLM files to JPG extension and play accordingly, as seen in above images. only JPG, TIF, GIF extensions are supported with 1.0 version of PIX recovery software.

Congratulations on recovering your most valuable images with this technique.

Still facing issues. contact me.

Thanks


Hello All, Windows 8 has made it’s mark into market and I see some are comfortable using Metro UI and Some not; maybe they are Apple Fans after all 🙂

So, I’ve decided to contribute little myself to this new Microsoft Product.

So, When First Logged On The Windows Key Doesn’t work for you. You have to Press Either “Win+M” or Desktop From Metro Interface,
So you can stat using Windows Key to switch between Opened Windows And Metro UI.

So Try this Keys… “Windows+M”

“Windows+C” for Right Hand Side Options Menu  Aka Charms bar

“Windows+I” for Settings

“Windows+D” for Desktop

“Windows+F” for Searching Files and Programs

“Windows+H” Share Currently Selected File With list of Programs

“Windows+K” Second screen Option

“Windows+P” Projecting Screen

“Windows+Y” Ease of Access Conter

“Windows+R” Start the Run

“Windows+E” Open Explorer. Open Computer Window in DesktopUI

“Windows+Q” Shows list of All Applications installed on your PC – Search utility

Try above shortcuts to save your time and get comfortable using New Windows 8, which was a Shift in Microsoft’s Tradition. Welcome such New Features and Improvements.

Thanks, Chaladi


You Can Always Disable AutoPlay for a USB or CDs or Portable Hard Disks Manually, by Holding Down the Shift Key and Inserting the Media. But some find it useless, tired, irritated or wanted to Get rid of AutoPlay Completely for the Sake of Simplicity, Avoiding Autoplay Popup Windows or To Avoid Auto-executing the Scripts those were in Media.


To Apply this Permanent Solution, getting rid of AutoPlay, Simply Deselect the AutoPlay Feature from Control Panel; Follow this Navigation in your Windows to achieve this settings visible from Below Screenshot

Goto Start Menu-> Control Panel -> Hardware and Sound-> AutoPlay” and there you can Deselect the use AutoPlay for All Media and Devices, or You can Manually input settings for Individual Media types to act accordingly by the Media Type. Suppose for CDs to AutoPlay, but USBs to not, You can tell the Same here in settings.


Thanks! chaladi


%d bloggers like this: