You Can Always Disable AutoPlay for a USB or CDs or Portable Hard Disks Manually, by Holding Down the Shift Key and Inserting the Media. But some find it useless, tired, irritated or wanted to Get rid of AutoPlay Completely for the Sake of Simplicity, Avoiding Autoplay Popup Windows or To Avoid Auto-executing the Scripts those were in Media.
To Apply this Permanent Solution, getting rid of AutoPlay, Simply Deselect the AutoPlay Feature from Control Panel; Follow this Navigation in your Windows to achieve this settings visible from Below Screenshot
Goto “Start Menu-> Control Panel -> Hardware and Sound-> AutoPlay”and there you can Deselect the use AutoPlay for All Media and Devices, or You can Manually input settings for Individual Media types to act accordingly by the Media Type. Suppose for CDs to AutoPlay, but USBs to not, You can tell the Same here in settings.
Update: This Method Actually Formats the whole capacity and Will require you to restore your IPOD to factory settings. This is for erasing the Games and some stupid content in IPOD, and freeing up Space for mush desired Music and Videos or required
Hey Guys! Now it’s time to wordpress a situation about Ipod Nano being unrecognized in iTunes or/and Windows Explorer, where nothing ahead we can proceed to make use of IPod. For this process to be able to succeed, we need to see the Device partially recognised, means device is Visible in greyed out or hidden like Volume mounted in Windows Explorer, but when tried to access the disk, it says, Please insert a disk, something like that message. this is to format the Whole iPOD and bring out new fresh IPOD. But if you wish to make use of data in the iPOD, just uninstall the drivers for IPOD in Device Manager and Re-install or scan for new hardware changes being installed itunes and connected to internet for better drivers install.
So, how exactly to solve this problem; here it follows. Once you are confident that the volume is recognised, but cannot access the disk either itunes way or volume way in Windows, you have to go to Command Prompt in Windows by pressing Windows+R key together to start a run dialog box and press CMD in there. or type cmd in Start search box and hit enter. Once you are there at the elevated command prompt type the following commands to check whether your iPOD is recognised as a volume disk or not “cd: F:” Pleas note that, here F is the Disk that Ipod has been granted to mount on Windows. It varies as per your system. To make sure what is your Disk name, check the Windows before connecting IpOD and later , to see the newly mounted Disk. Once confirmed that its the only Disk of IPOD, proceed with the given Disk LEtter
if it says the volume is there but not recognised or corrupted, then with the confident that F or the Given Disk letter, Proceed to format the volume disk with the following commands
“format F:”
Once the command is successfully passed onto IPOD Disk, the Formatting option will start formatting the drive with the New EXFAT file system, that will format the drive and will help you recover the iPOD disk back to working in itunes and Windows being recognised.
Hope this help some frustrated Patrons.
Thank you. any further info or queries, happy to help through comments made here.
In This post, I came forward with a solution for WI-FI connectivity issues on Samsung galaxy SII, where the WI-FI switching is taking too long time to turn on.
I have faced the same problem and been to number of forums; XDA First off and blogs and tried several, though it didn’t worked for me, the motivation lead me to find an alternative way, which will surely work.
First Try, Going to Flight Mode and then Coming Back To Normal Mode, this works major times, If not happy with this process, go ahead with this process… flashing kernel. because the problem is with the drivers that are not properly coordinating with the System Boards. So let’s workaround that way
I have reflashed my Kernel with New latest Siyah Kernel 3.5.2. I am writing this in context of galaxy SII – I9100 Users only and Must be rooted your phone. If you don’t know rooting, you probably can’t try this to fix your issue.
Try flashing your kernel from your CWM manager within your phone or from ODIN tool Either from computer or from your phone having ODIN installed. I recommend CWM, as the flashing process is smooth and goes good. Download the below mentioned files and place the extracted zImage file in your phone and flash em…
Download the Below Files, Any One, as per your procedure requirements
Download this and extract the files from ZIP folder and copy the zImage file in your sdcard location and open the CWM and flash the Kernel, Not the ROM. Be careful, to flash the kernel with this zImage only, If other images are there in the same directory move them, or move this file to new folder, where you can easily recognize the image file location.
From this, you can see, the flash kernel option is available. However since, this is CF-ROOTED and CWM is managed through CF-KERNEL, the flashing of ROM option has been disabled, once the siyah kernel has been flashed for kernel. I respect the Chain Fire however, until new stable WI-FI working kernel is released, I am sticking with Siyah Kernel, as I can use the Dual ROMs now…
Okay. So concisely, Flash your kernel with this latest stable Working Siyah Kernel, You can be on Whatever ROM version, Flash this and See the issues fixed.
For queries or if clarifications is needed with this writing, revert back to me, I am happy to furnish the details.
If not fixed, or facing problems, mention the problems here, and I will be working at my best to fix them for you.
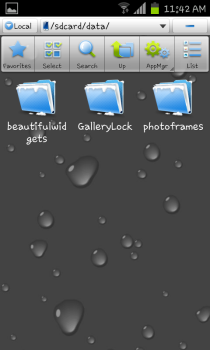
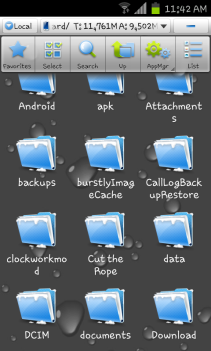
Hello, This Post is all about Recovering Locked files from Gallery Lock (pro) Application In Android, in cases like Forgot Password and security Answer. This post helps you recover files easily from either Desktop Comfort or from within Mobile comfort. The files once locked with Gallery Lock are stored in Application Specific Directory; that is Data Directory in the Phone’s Memory.
Check the below screenshots:
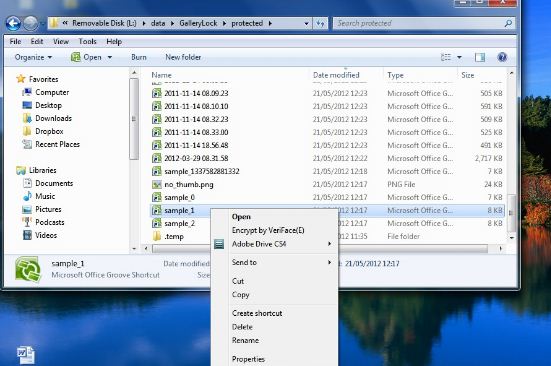
Once You accessed the Data Directory of gallery Lock, the Protected Folder is presented, which contains the locked files with the .glk extension. All you have to do is, cut them all; needed files and paste to some other folder (You need to move the files, because later if you ever wanted to lock the files again or just wanted to uninstall the Application; you will be in big trouble loosing your files) Rename the files with .jpeg extension; And you have just successfully unlocked aka recovered aka rescued files. In-case you wanted to do this in windows with the usb storage mounted onto Windows, you have to go into the same folders specified and move the files to different folder (Note that the visibility of known file types extensions are hidden in the Folder Options in Windows, so you have to first disable this option and proceed to rename the files to .jpeg extension) Detailed instructions given below:
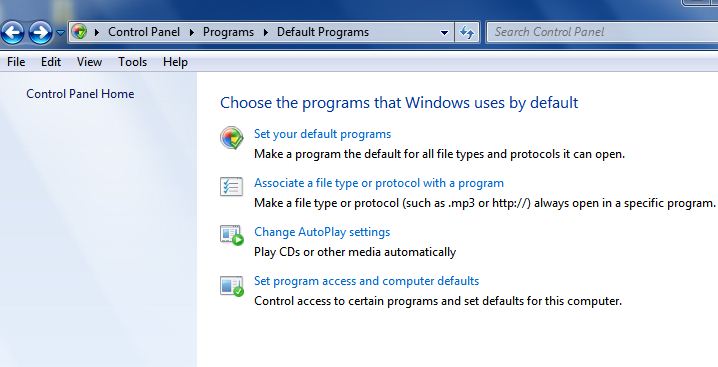
In cases like if you have groove installed in your system with the Office product installed, the chances of changing the file extension will be difficult, so I have addressed the same issue and came forward with the solution. See the below screenshots. The file association should be changed in the control panel to fix this case, once you change the file association to txt or someother type, you will be able to rename the extension from windows explorer context.
Once you are in the file association menu, change the file association to notepad and apply, then you are presented with the extension views for the .glk files in windows. See the below screenshots.
And that’s it! you are done recovering the files, either way; via Mobile or through Computer rescuing the files. Remember the Via Mobile files recovery here has been made through ES Explorer, a free File Manager to use in Android to explore the files and directories. Thank you. Welcoming Comments and queries
This post will show you how to increase your default pagefile in windows to desired maximum. As this increment will help your system have more memory resources to outperform in some cases.
I have made a Video that will Show you precisely the instructions on how to increase the page file.
Today (31-May-2010), I am gonna write some needed info on DNS (Domain Name Service), which will be useful for Dummies or for beginners of Linux.
Well, can I ask you the reason why your attention has been pulled up by Linux? Oh you could tell the same in comments section.
No more Scum, going straight into technology. I want the patience and of course Applause (Kidding!).
Linux gives you more flexibility and smooth life that you usually do need to sacrifice your lives on some machines. DNS is an essential thing, that should be deployed in the IT world for the humanity sake.!! Well DNS is the technology that performs Forward and reverse lookup operations. Oh I am going in-depth.. well let me be clear in my path, giving the definitions and words life.
Well, what’s your favorite web-site? Think of it! Oh-yeah, So every time you visit your favorite web-site by just entering the website name in your favorite web browser (Soon the web browser section will be blogged down) and abracadabra – Your are there, watching your favorite site in the browser. Well actually, Just like as you have been named by your father & mother for the human race sake, every computer should be and will be named with unique name; that’s the IP address (Ex: 192.168.10.20: To see your own IP address; I mean your computer’s IP not your personal IP, as your Mom & Dad have already named you and with the gods grace you are Human not Freaking machine- Just Type “ifconfig” command in Linux boxes & in Windows, type “ipconfig”, be sure to remove the quotations and to use just the rest letters. make sure you logged into your linux machine as root, not with your name or alternatives, ‘Cos the ifconfig won’t work on some machines in Linux distributions; I mean distributions are like Centos, Debian, Suse, Fedora etc.,).
So, morally, the computer machines in the whole world are assigned their names with unique numbers (Local and Internet participating computers have a controversial words now, with this statement). So, as of now, the said things on DNS is all about IP address and blah blah blah…… But that’s not a scum nor a spam to inject into your head. More to come, be patience.
As said, Each Computer will be assigned a IP address (numbers) and the computers identify them each other with the same (IP to IP). As the Humans couldn’t be able to memorize the numbers in hefty, the human intervention to make such serious situations smooth has been done. I mean, DNS has been deployed: The act of performing the name to IP address and Vice versa. this is just like as your favorite web-site name: for instance, Facebook.com is your favorite web-site, every time you visit the web-site with facebook.com typing in the browser address bar, Right! so in this case the Facebook.com is a Canonical name (alternative name) for the facebook.com computer. So the need to remember the IP address of 100’s of web sites is not needed; better that site names are easier to remember so. Isn’t it? That’s the same aspect of DNS innovated person.
So, It is the DNS that is making your life more comfort every time you visit the internet, else, I BET-YOU that the chances of visiting your favorite web-sites or being online will be drastically reduced, Isn’t it? Inevitably yes to say so. Hmm… Lemme grab a Cup of coffee for the survival.
(5 minutes later) Hmm.. that latte is much better, relaxing, moreish! So far I have been much into IP addresses, Hope, not you are bored yet! ☺♥♥♥. So DNS is comforting you from the corners of the IT technology to give you intense pleasure to enjoy the IT services. So, i hope you have investigated that, DNS is more important and vital for everyday life as well, for an IT person (Not Farmer nor a Plumber, as he is no way related or connected to IT services daily: Bet you Old ladies, you are on the list probably).
So, if you want to visit the facebook.com site, you can alternatively visit the site with the IP address as well: http://69.63.189.16/ …. This is what i am trying to tell you since from the beginning of the post…. Hope you got me at last…. So in this way, you can either use IP address or alternatively the Cnames (facebook).
In your Linux machines, the /etc/hosts file is more important and is vital for networking. The computer is said to see the local database (/etc/hosts) first and later the DNS servers for the query performing. If the local database /hosts file has the complete database of local computers IP address and their Cnames, the query needs no DNS server, else the need of DNS server is needed to resolve the names to IP address and IP to names. The settings to look firs the local database and later for the DNS server for resolutions are configured in /etc/nsswitch.conf file.
This post has been prepared to give you insights of the DNS technology, furthermore for the detailed info on DNS and setting up the DNS in Linux machines, please feel free to visit again for the information acquiring purposes. Soon the post with DNS installation on Linux distributions would be published.
If you have any comments to say so regarding the post or quality of the post, please comment or get me in contact @ twitter.com/chaladhi