Category: Installation Issues


As the title says, this post will list out the common installation errors we might encounter when deploying Azure Stack for POC purposes.

Time Zone issue: When deploying the Azure stack, the first run of powershell script will ask you to input Computer Name, IP, DNS and Time zone configurations. In case if the time zone settings are left as is / configured incorrectly – means Azure stack host Operating system Time zone is different, then Post DC VM installation, the script will fail because the time sync will have problems and authentication of Azure stack host with the DC to join it to the deployed Azure stack DC will have issues. – Authentication related error will throw.


Access Denied on Stack VMs from Host powershell session: This is because when the VMs are deployed using powershell and are rebooted as part of configurations, there are chances that required  Ops-Administrators Group doesn’t get added to the VMs. In this case we will have to login/remote to the concerned VM and validate the local administrators group.


How to add Ops-Admins to the Local Admins group is listed below:


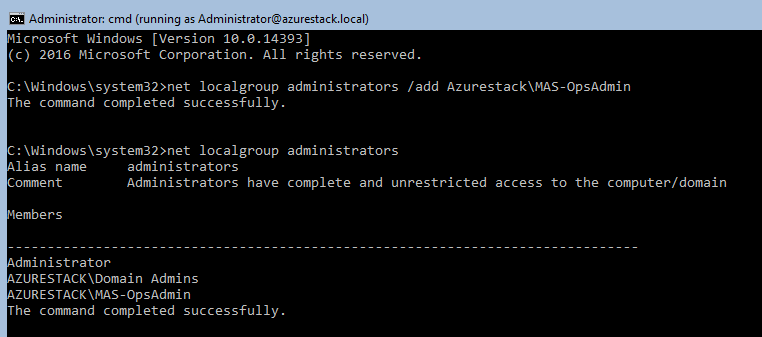
The reason it fails to access the VMs remotely from the powershell session we do -rerun command is that we login to the Azure stack host as FabricAdministrator and this same account doesn’t have access to the VMs because of some skipped/misconfiguration.

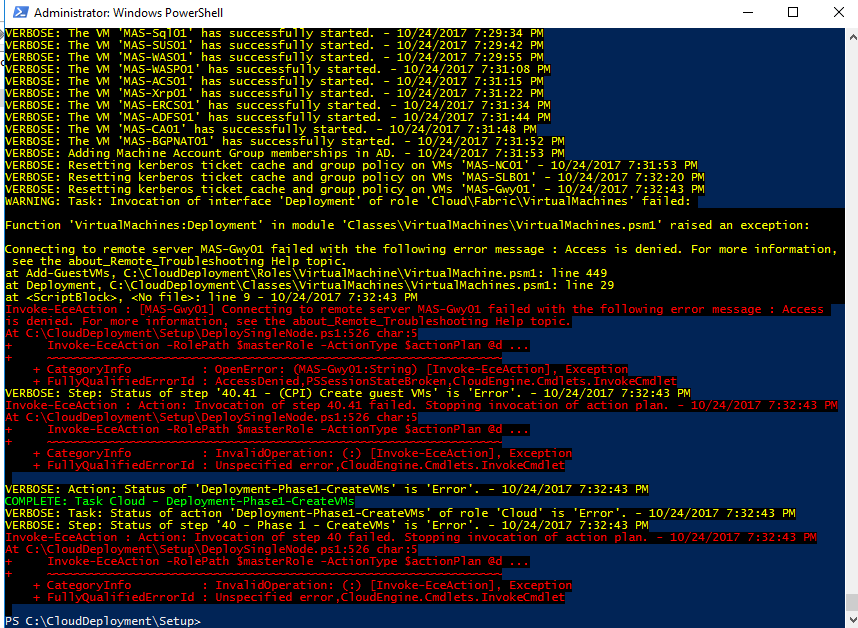
VM Installation failed with the unexpected restart error: There can be multiple reasons why a VM fail at this step. Primarily it hints about underlying hardware specs and mounted ISO image integrity as well – since Azure stack powershell deploys VM using VHD it has pre-built, mostly due to underlying storage IOPS issues, the VM might fail to boot within time/ crash during installation.  If you see any VM failed to boot and Script fails to continue as it needs VM be up and remotely accessible via PS, then You can delete the VM from FCM / Hyper-V and -rerun the stack deployment.


Other issues we might commonly encounter is due to Resources availability and Time out due to VMs failing to respond / boot.

Main limitation in deploying Azure Stack POC is mostly due to Storage. As all the VMs run off of same Disk, available throughput, IOPS for all the VMs considerably falls low. Spreading disks on multiple HDDs for S2D pool will increase the performance. Another feasible option is to use SSHDs – if budget allows :).

In Azure stack POC publicly released, Nuget Packages are little modified. Cloud deployment nuget package now sectioned configuration of VMs individually, that means we have to define the Memory, CPU and Dynamic Memory configs in the OneNodeRole.xml configuration file of each individual VM roles.

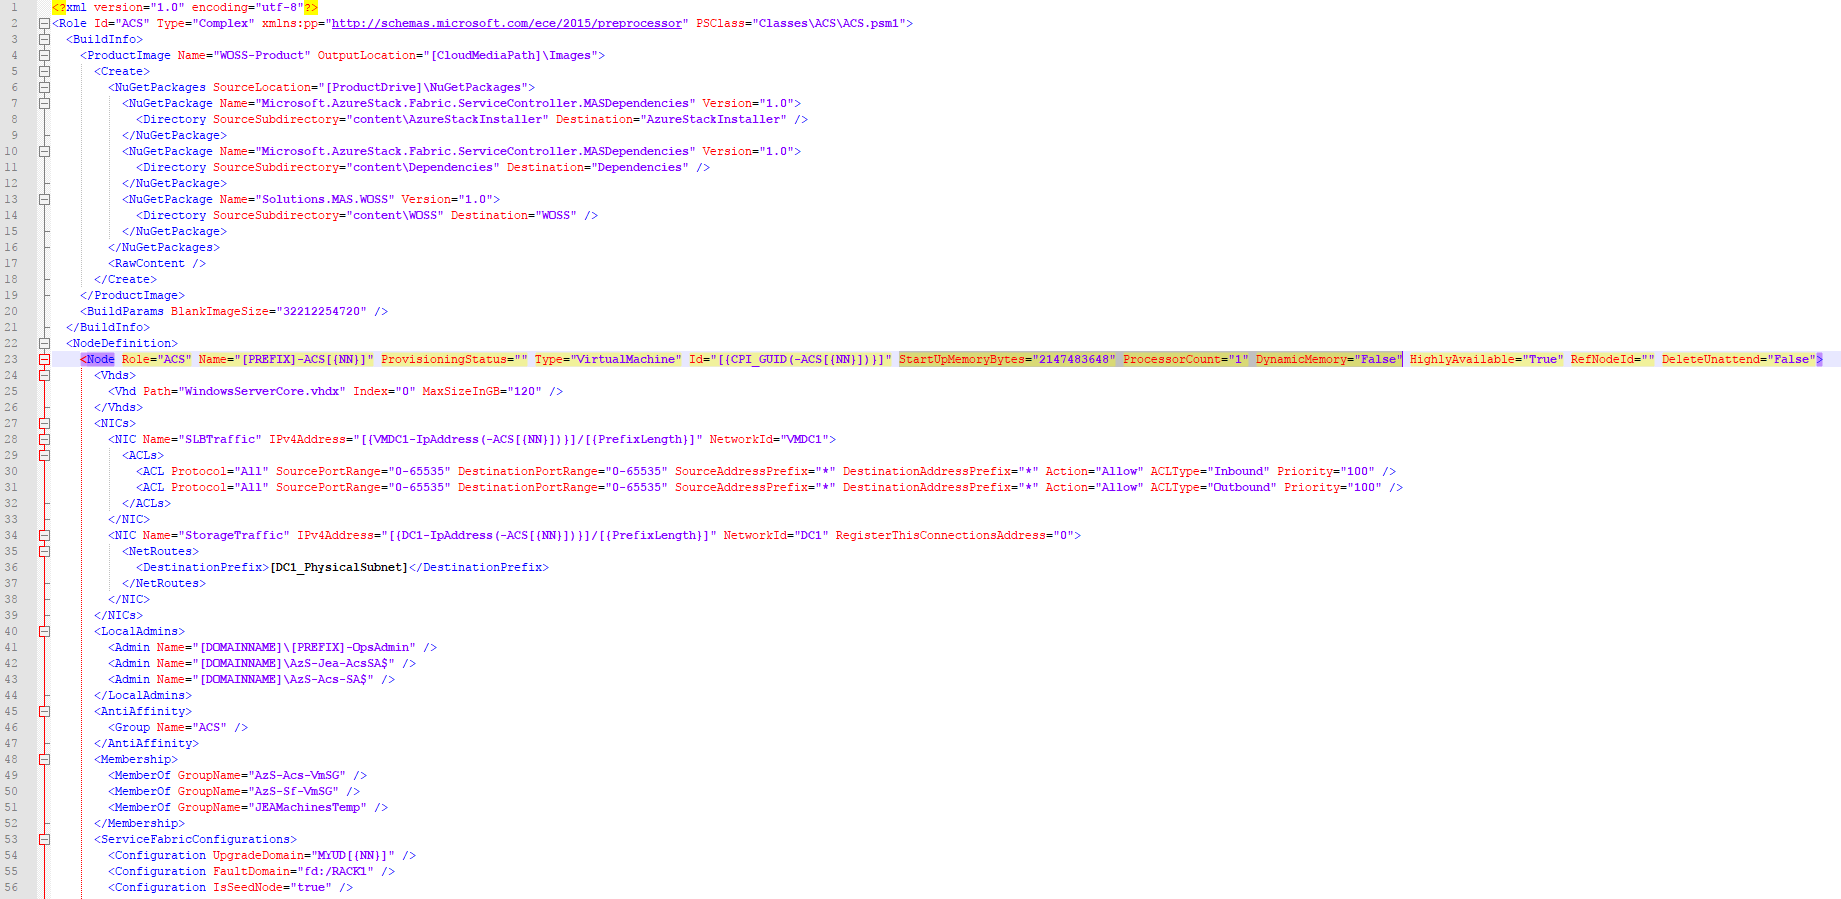
As we can see from the above config file, Memory, CPU and Dynamic Memory settings must be defined for each Azure Stack VM individually in the “CloudDeployment.1.0.597.18.nupkg” file. The exact path to access the individual VMs to configure can be seen from the Rar file screenshot above – “\Content\Configuration\Roles\Fabric\*”  If this needs a detailed post, please send your requests, so as per requirements I will write a new blog post to deal with this.


Update: This Method Actually Formats the whole capacity and Will require you to restore your IPOD to factory settings. This is for erasing the Games and some stupid content in IPOD, and freeing up Space for mush desired Music and Videos or required

Hey Guys! Now it’s time to wordpress a situation about Ipod Nano being unrecognized in iTunes or/and Windows Explorer, where nothing ahead we can proceed to make use of IPod. For this process to be able to succeed, we need to see the Device partially recognised, means device is Visible in greyed out or hidden like Volume mounted in Windows Explorer, but when tried to access the disk, it says, Please insert a disk, something like that message. this is to format the Whole iPOD and bring out new fresh IPOD. But if you wish to make use of data in the iPOD, just uninstall the drivers for IPOD in Device Manager and Re-install or scan for new hardware changes being installed itunes and connected to internet for better drivers install.

So, how exactly to solve this problem; here it follows. Once you are confident that the volume is recognised, but cannot access the disk either itunes way or volume way in Windows, you have to go to Command Prompt in Windows by pressing Windows+R key together to start a run dialog box and press CMD in there. or type cmd in Start search box and hit enter. Once you are there at the elevated command prompt type the following commands to check whether your iPOD is recognised as a volume disk or not “cd: F:” Pleas note that, here F is the Disk that Ipod has been granted to mount on Windows. It varies as per your system. To make sure what is your Disk name, check the Windows before connecting IpOD and later , to see the newly mounted Disk. Once confirmed that its the only Disk of IPOD, proceed with the given Disk LEtter

if it says the volume is there but not recognised or corrupted, then with the confident that F or the Given Disk letter, Proceed to format the volume disk with the following commands

“format F:”

Once the command is successfully passed onto IPOD Disk, the Formatting option will start formatting the drive with the New EXFAT file system, that will format the drive and will help you recover the iPOD disk back to working in itunes and Windows being recognised.

Hope this help some frustrated Patrons.

Thank you. any further info or queries, happy to help through comments made here.


I have recently faced this Script error while installing VMware Workstation on my Laptop. This is quite annoying that we can’t past this screen even accepting the error with “YES” or “NO”.

VMware Communities recommended to  install it in Silent mode background install, Hopefully that worked for some people, who are lucky maybe if they haven’t saw this awesome method whilst their time…

This method involves, just changing your temp file directory temporarily. So a minor changes are needed to install VMware Workstation Successfully on your Machine, bypassing the script errors and any issues.

First off, Go to System properties by right-clicking the computer and selecting the properties option, and then following to click the Advanced System Settings in the Left hand side 


Once You are at this Environment Variables Screen, All you have to do is to Edit the TEMP and TMP FILES Path to C:\Tmp path. Once you do that with the system and user variables, the installation will proceed smoothly. Remember to copy the paths of the original “TEMP” and “TMP” paths to “Notepad” to revert back to original TEMP and TMP paths once Workstation installation has been successful. Do for the both System and User environment variables.

When changed to C:\Tmp file path, the extracting files of Vmware workstation would be done to Tmp file in C, where the script errors that are occuring can be fully resolved with this method. The temp path has issues when reading the index.htm file in extracted Vmware folder. You can name your TEMP and TMP files as you wish, but remember to revert back to original PATHS for TEMP and TMP in environment variables, once your installation is made.

Hope this helps other panicked, irritated patrons.

Chaladi