Update: USB OTG Helper application will solve NTFS formatted USB Drives to be mounted on phone. THis is available in XDA forums only as of yet!
This is to notify the solution for How to fix the external SD cards mounting issues on windows 7 in Jelly bean or related Android OS.
If you have came from ICS or GB flavors, the probability is that you have used your file exploreres within your Device to see the Exernal SD card (Micro SD here) and Internal sd card (USB Storage) in an easy ways, representing external Sd card folder and usb storage folders in their respective denomination; an easy navigation, not much confusion isn’t it?.
But ever since JB arrived, the storage devices location are little changed; perhaps accurate this time if get used to; are mounted in “/storage” path as /sdcard0 representing internal USB storage space and /sdcard1 representing microsd card Another path /USBdisk is for the OTG (On the GO USB cable attached flash drives can be seen there in this path folder.) natively supports FAT/FAT32 formatted USB Flash drives, if NTFS support is needed, try you luck with NTFS Mounter. So, since this path has been changed, some already existing Softlinks (shortcuts in windows context) target to that sdcards.
I can put down a lot of words here, but the solution is important however; for most people, so confining with thus stated information. Since the above mentioned words help for some people who are looking for sdcard locations within their Phone; who confused seeing the external sd card folder empty :-0. So how to fix mounting issues in windows 8, 7 or Vista is, here: just install Multi Mount SD card from Market or from your known sources and that’s it. You will see the sd cards mounted on your PC and at the same time you can access SD cards on your Phone as well. Try not use the Other methods, when using Multi Mount SD method. use Widget on your screen to activate and deactivate application aka Mounting and Unmounting Disk drives.
This Post is Just about Windows 8 Release Preview Edition Sneak Peek. Insider Views and Menus, typical installation screen changes, Accounts activities, Locking and logging off screens, gadget bars and Start menu of new Windows 8 Edition.
Look at the Video and have a great Sneak Peek of Windows 8 Release Preview Edition
I have recently faced this Script error while installing VMware Workstation on my Laptop. This is quite annoying that we can’t past this screen even accepting the error with “YES” or “NO”.
VMware Communities recommended to install it in Silent mode background install, Hopefully that worked for some people, who are lucky maybe if they haven’t saw this awesome method whilst their time…
This method involves, just changing your temp file directory temporarily. So a minor changes are needed to install VMware Workstation Successfully on your Machine, bypassing the script errors and any issues.
First off, Go to System properties by right-clicking the computer and selecting the properties option, and then following to click the Advanced System Settings in the Left hand side
Once You are at this Environment Variables Screen, All you have to do is to Edit the TEMP and TMP FILES Path to C:\Tmp path. Once you do that with the system and user variables, the installation will proceed smoothly. Remember to copy the paths of the original “TEMP” and “TMP” paths to “Notepad” to revert back to original TEMP and TMP paths once Workstation installation has been successful. Do for the both System and User environment variables.
When changed to C:\Tmp file path, the extracting files of Vmware workstation would be done to Tmp file in C, where the script errors that are occuring can be fully resolved with this method. The temp path has issues when reading the index.htm file in extracted Vmware folder. You can name your TEMP and TMP files as you wish, but remember to revert back to original PATHS for TEMP and TMP in environment variables, once your installation is made.
Hope this helps other panicked, irritated patrons.
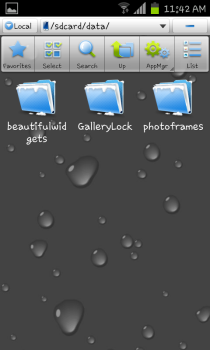
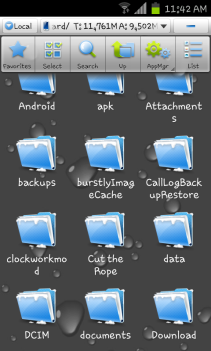
Hello, This Post is all about Recovering Locked files from Gallery Lock (pro) Application In Android, in cases like Forgot Password and security Answer. This post helps you recover files easily from either Desktop Comfort or from within Mobile comfort. The files once locked with Gallery Lock are stored in Application Specific Directory; that is Data Directory in the Phone’s Memory.
Check the below screenshots:
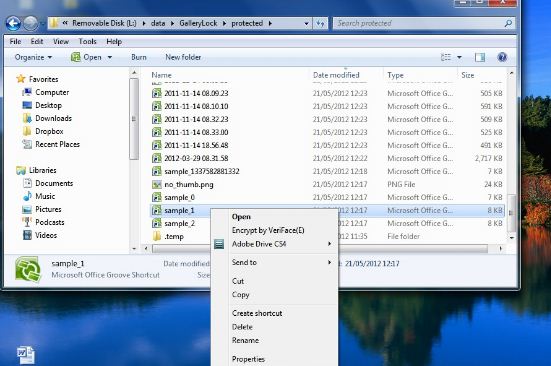
Once You accessed the Data Directory of gallery Lock, the Protected Folder is presented, which contains the locked files with the .glk extension. All you have to do is, cut them all; needed files and paste to some other folder (You need to move the files, because later if you ever wanted to lock the files again or just wanted to uninstall the Application; you will be in big trouble loosing your files) Rename the files with .jpeg extension; And you have just successfully unlocked aka recovered aka rescued files. In-case you wanted to do this in windows with the usb storage mounted onto Windows, you have to go into the same folders specified and move the files to different folder (Note that the visibility of known file types extensions are hidden in the Folder Options in Windows, so you have to first disable this option and proceed to rename the files to .jpeg extension) Detailed instructions given below:
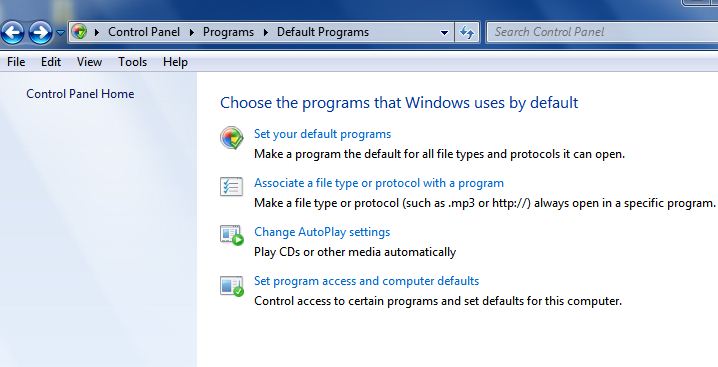
In cases like if you have groove installed in your system with the Office product installed, the chances of changing the file extension will be difficult, so I have addressed the same issue and came forward with the solution. See the below screenshots. The file association should be changed in the control panel to fix this case, once you change the file association to txt or someother type, you will be able to rename the extension from windows explorer context.
Once you are in the file association menu, change the file association to notepad and apply, then you are presented with the extension views for the .glk files in windows. See the below screenshots.
And that’s it! you are done recovering the files, either way; via Mobile or through Computer rescuing the files. Remember the Via Mobile files recovery here has been made through ES Explorer, a free File Manager to use in Android to explore the files and directories. Thank you. Welcoming Comments and queries
This post will show you how to increase your default pagefile in windows to desired maximum. As this increment will help your system have more memory resources to outperform in some cases.
I have made a Video that will Show you precisely the instructions on how to increase the page file.
In this Post, i am gonna show you how to install CentOS in VMware workstation.
The below Video tutorials will take you to the edge of the process and explain you the complete installation process and services, things that counts when the boot process of the CentOS box initiates.
In the midst of the Video tutorials, the cursor has been intentionally dragged, highlighted some words, to show, say you the important things at the concerned stage. The Settings section in the midst of the installation process will come up with the setting of IP address, HOSTNAME for the CentOS, however the settings were not saved nor used later, the setup has been just show you that the setup of Static IP and HOSTNAME can also be achieved whilst installation. The later setup of HOSTNAME can be acquired from this LINK
For Linux it is recommended to disable the Firewalls and SE Linux (Security Enhanced), Ços the services interaction and communications of concerned protocols will fail by blocking so. However it can also be activated (firewall), but the manual port setup, services configurations are to be done after logging into CentOS box.
Part 1:
Part 2:
The setup of username and password is recommended and meant to be strong enough to secure your CentOS BOX.
If you have any doubts or queries regarding the setup or the process used for the setup, please do not hesitate to message me @twitter.com/chaladhi or comment here. As of your convenience. !!! :~)
In this post, I have came forward with the instructions and guidance to set the permanent hostname for the CentOS box.
In this video, you find the needed configurations to setup the HOSTNAME.
The ip-address you see in the /etc/hosts file has been acquired from the concerned system, using the “ifconfig” command. The ipaddress is needed to mention the hostname in the hosts file. However you can find the ipaddress of your own computer using Ifconfig command in TUI (terminal) mode.
The setup has been chosen in the CentOS platform, as the demand is noticed in high. You can follow the same instruction for other Linux distributions, however the path, commands, Shell usage affects the process.
Here I have used “nano” as text editor to edit the configurations files, however you can use you favorite text editor; VI, CAT or other’s. After i have used the nano /etc/sysconfig/network or other files editing, i have manipulated the files and i have saved the configurations using the CTRL+X buttons click and pressing the Y button for the asked query, whether to save the changes or not by the nano editor; so i am saying yes to save the things. This will save the configured things.
you do need to exit the current working shell to notice the changes of hostname. However it is recommended to logout of the box after changes and login back again. The next post about how to set-up DNS will be published soon.
Here in the video, the hostname has been mentioned as linuxbox1, and the fqdn has been assigned as the linuxbox.centos1; however it is recommended to use the linux box as the hostname or to change the fqdn to be as linuxbox1; both are acceptable. (edited-16-06-10)
If you have any queries, comment here or else you can reach me @ twitter.com/chaladhi or facebook.com/chaladi
Today (31-May-2010), I am gonna write some needed info on DNS (Domain Name Service), which will be useful for Dummies or for beginners of Linux.
Well, can I ask you the reason why your attention has been pulled up by Linux? Oh you could tell the same in comments section.
No more Scum, going straight into technology. I want the patience and of course Applause (Kidding!).
Linux gives you more flexibility and smooth life that you usually do need to sacrifice your lives on some machines. DNS is an essential thing, that should be deployed in the IT world for the humanity sake.!! Well DNS is the technology that performs Forward and reverse lookup operations. Oh I am going in-depth.. well let me be clear in my path, giving the definitions and words life.
Well, what’s your favorite web-site? Think of it! Oh-yeah, So every time you visit your favorite web-site by just entering the website name in your favorite web browser (Soon the web browser section will be blogged down) and abracadabra – Your are there, watching your favorite site in the browser. Well actually, Just like as you have been named by your father & mother for the human race sake, every computer should be and will be named with unique name; that’s the IP address (Ex: 192.168.10.20: To see your own IP address; I mean your computer’s IP not your personal IP, as your Mom & Dad have already named you and with the gods grace you are Human not Freaking machine- Just Type “ifconfig” command in Linux boxes & in Windows, type “ipconfig”, be sure to remove the quotations and to use just the rest letters. make sure you logged into your linux machine as root, not with your name or alternatives, ‘Cos the ifconfig won’t work on some machines in Linux distributions; I mean distributions are like Centos, Debian, Suse, Fedora etc.,).
So, morally, the computer machines in the whole world are assigned their names with unique numbers (Local and Internet participating computers have a controversial words now, with this statement). So, as of now, the said things on DNS is all about IP address and blah blah blah…… But that’s not a scum nor a spam to inject into your head. More to come, be patience.
As said, Each Computer will be assigned a IP address (numbers) and the computers identify them each other with the same (IP to IP). As the Humans couldn’t be able to memorize the numbers in hefty, the human intervention to make such serious situations smooth has been done. I mean, DNS has been deployed: The act of performing the name to IP address and Vice versa. this is just like as your favorite web-site name: for instance, Facebook.com is your favorite web-site, every time you visit the web-site with facebook.com typing in the browser address bar, Right! so in this case the Facebook.com is a Canonical name (alternative name) for the facebook.com computer. So the need to remember the IP address of 100’s of web sites is not needed; better that site names are easier to remember so. Isn’t it? That’s the same aspect of DNS innovated person.
So, It is the DNS that is making your life more comfort every time you visit the internet, else, I BET-YOU that the chances of visiting your favorite web-sites or being online will be drastically reduced, Isn’t it? Inevitably yes to say so. Hmm… Lemme grab a Cup of coffee for the survival.
(5 minutes later) Hmm.. that latte is much better, relaxing, moreish! So far I have been much into IP addresses, Hope, not you are bored yet! ☺♥♥♥. So DNS is comforting you from the corners of the IT technology to give you intense pleasure to enjoy the IT services. So, i hope you have investigated that, DNS is more important and vital for everyday life as well, for an IT person (Not Farmer nor a Plumber, as he is no way related or connected to IT services daily: Bet you Old ladies, you are on the list probably).
So, if you want to visit the facebook.com site, you can alternatively visit the site with the IP address as well: http://69.63.189.16/ …. This is what i am trying to tell you since from the beginning of the post…. Hope you got me at last…. So in this way, you can either use IP address or alternatively the Cnames (facebook).
In your Linux machines, the /etc/hosts file is more important and is vital for networking. The computer is said to see the local database (/etc/hosts) first and later the DNS servers for the query performing. If the local database /hosts file has the complete database of local computers IP address and their Cnames, the query needs no DNS server, else the need of DNS server is needed to resolve the names to IP address and IP to names. The settings to look firs the local database and later for the DNS server for resolutions are configured in /etc/nsswitch.conf file.
This post has been prepared to give you insights of the DNS technology, furthermore for the detailed info on DNS and setting up the DNS in Linux machines, please feel free to visit again for the information acquiring purposes. Soon the post with DNS installation on Linux distributions would be published.
If you have any comments to say so regarding the post or quality of the post, please comment or get me in contact @ twitter.com/chaladhi


 show you how to install CentOS in VMware workstation.


