Category: How To


Hi All, Yet another Blog post about solving the Obtaining IP Address and Authenticating issues with the Mobile phones, that’s keep looping the same error whilst connecting to Connectify Hotspot On your Laptop/Desktop.

The First basic thing is to allow Firewall to accept the Program traffic. For example Connectify Services like Connectifyd, ConnectifyNetworkService and Connectify service programs has to be allowed though Windows Advanced Firewall settings. This can be achieved as seen in the below screenshots.

You access Advanced Firewall Properties using Control Panel, and then System and Security and then Firewall Settings, there in the Left hand Panel you see advanced settings like shown in the below screenshots.

advancedfirewall connectifyinbound

As you can see the program is allowed in the inbound properties, and the same has to be done with the Outbound traffic as well. If your Firewall is being managed by thirdparty softwares like My Application do, then you have to configure settings at the Thirdparty software side.

I am using ESET Smart Security 6 for the firewall Protection, so, if yours is of same, watch this Video, on how to create new Zone Rules to allow Connectify or any other program or service or network that is explicitly Being rejected by ESET for communication.

So, watch this video and solve your connectify issues or related network issues with the ESET Smart Security.

Hope this helps!


[UPDATED POST with New Software Links]

Quick way around for recovery:

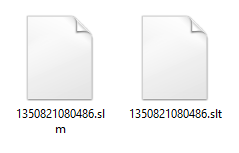
1. Copy “media” folder that contains all the folder, which contains all the .slm and .slt files, in “gallery_lock” folder in your sd card.
2. open application in your phone.
3. go to settings.
4. select “recovering locked media”.
5. select “detail recovery”.
6. tap on “recovery”.
7. you’ll find all the files recovered in “locked/safe photos”.

———————-Original Post ——————————–

Note: This also Applies to corrupted Photos and any Image File extensions. You can easily recover Corrupted, Damaged Photos with this Method.

Credit: Thanks to Rahul Mahawar for sending across the SLM and SLT files to work on them.

SLM Files

I was asked by many of my Blog Visitors about the SLM file recovery methods. I am very much sorry that I took so much long time to respond with the solution, just because I was bit busy and out of station, to be able to see comments and work on this much demanding Post.

First off, SLM stands for Media File, SLT stands for Thumb nail. So, Thumb nail can be recovered easily with the File extension change technique, however the original Photo; SLM cannot be recovered with the simple File extension changes. So, follow this awesome method to recover all your SLM files to revert back to Original Photos.

[UPDATE – 17-09-2015] Better alternative to PIXRECOVERY Software. Use Stellar Phoenix JPEG Recovery Software to recover multiple SLM Images at once. Test it using below Torrent link. Ensure you buy software once happy with the test results.

Stellar Phoenix Torrent Link

Alternatively you can use old PIXRECOVERY method if interested.

Download PIXRECOVERY SOFTWARE from torrent sites: Full version is available there at KAT.PH Click the left hand Link to visit torrent site . Please Note, I am not encouraging you to use Pirated software, Just navigating you to Use the software before you buy it, for confidence on Software you purchase it prior. If happy with purchase prior testing, you can navigate to this website and Buy it or download a Demo version as well: http://www.officerecovery.com/pixrecovery/

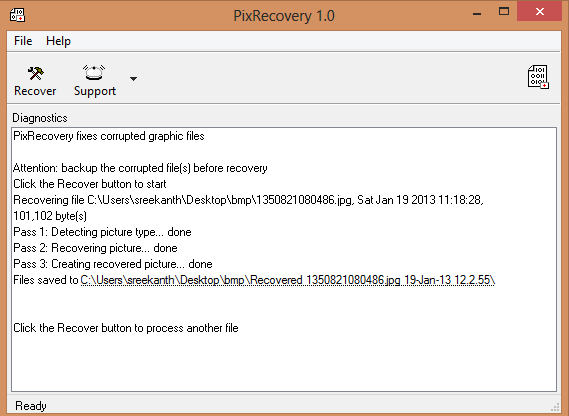
Once downloaded DEMO, or Installed FULL version of PIX RECOVERY. OPEN the PIX recovery and Click on Recover Menu. See below images:

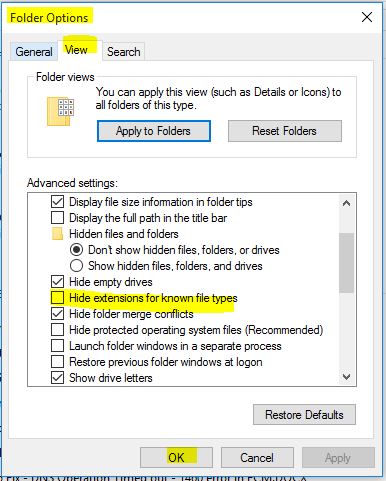
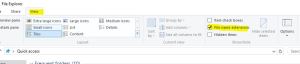
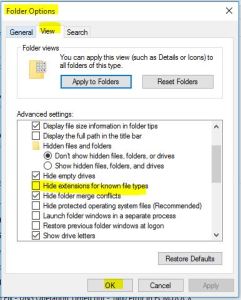
In Either Stellar software or Pixrecovery software recovery methods, you’ll have to rename the SLM File to .JPEG to get image loaded into software. Please Change the View options from Windows Explorer settings in case you have difficulty renaming the file extension – shown below:

Folder Options - Show File Extensions

Folder Options - Full

—-> Must Do – Change the SLM file extensions to JPG   <—- and then open it up in PIX recovery software and it will process automatically the images with individual folders created for IMAGES recovered. The safest way and fastest way recovering corrupted or encoded Images.

Note: SLT is not required to recover SLM files, You can copy and paste all the SLM files to computer and change the SLM file extensions to JPG and start recovering process then on…

PixRecovery_Success_1

Open Pix Recovery Files 1

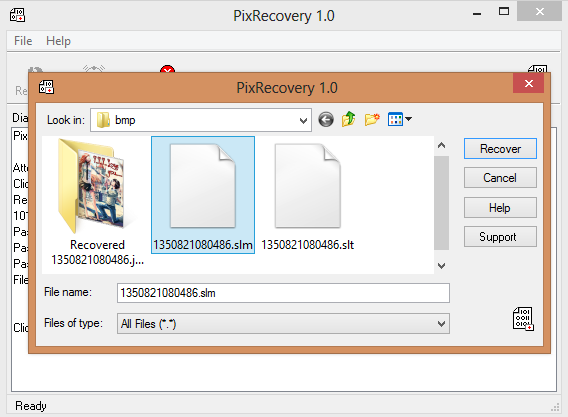
Change the SLM files to JPG extension and play accordingly, as seen in above images. only JPG, TIF, GIF extensions are supported with 1.0 version of PIX recovery software.

Congratulations on recovering your most valuable images with this technique.

Still facing issues. contact me.

Thanks


Hello All, Windows 8 has made it’s mark into market and I see some are comfortable using Metro UI and Some not; maybe they are Apple Fans after all 🙂

So, I’ve decided to contribute little myself to this new Microsoft Product.

So, When First Logged On The Windows Key Doesn’t work for you. You have to Press Either “Win+M” or Desktop From Metro Interface,
So you can stat using Windows Key to switch between Opened Windows And Metro UI.

So Try this Keys… “Windows+M”

“Windows+C” for Right Hand Side Options Menu  Aka Charms bar

“Windows+I” for Settings

“Windows+D” for Desktop

“Windows+F” for Searching Files and Programs

“Windows+H” Share Currently Selected File With list of Programs

“Windows+K” Second screen Option

“Windows+P” Projecting Screen

“Windows+Y” Ease of Access Conter

“Windows+R” Start the Run

“Windows+E” Open Explorer. Open Computer Window in DesktopUI

“Windows+Q” Shows list of All Applications installed on your PC – Search utility

Try above shortcuts to save your time and get comfortable using New Windows 8, which was a Shift in Microsoft’s Tradition. Welcome such New Features and Improvements.

Thanks, Chaladi


You Can Always Disable AutoPlay for a USB or CDs or Portable Hard Disks Manually, by Holding Down the Shift Key and Inserting the Media. But some find it useless, tired, irritated or wanted to Get rid of AutoPlay Completely for the Sake of Simplicity, Avoiding Autoplay Popup Windows or To Avoid Auto-executing the Scripts those were in Media.


To Apply this Permanent Solution, getting rid of AutoPlay, Simply Deselect the AutoPlay Feature from Control Panel; Follow this Navigation in your Windows to achieve this settings visible from Below Screenshot

Goto Start Menu-> Control Panel -> Hardware and Sound-> AutoPlay” and there you can Deselect the use AutoPlay for All Media and Devices, or You can Manually input settings for Individual Media types to act accordingly by the Media Type. Suppose for CDs to AutoPlay, but USBs to not, You can tell the Same here in settings.


Thanks! chaladi


Hey Guys, When you are trying to Sleep On Bed, But Your Laptop or PC is not Ready to Sleep When idle, Then there are Couple of Options we should try to Let it Accept to sleep As usual. First off, You should try the Procedures Mentioned in Microsoft KB (Knowledge Base) to Put Windows 7 Into Sleep Mode again, and If you have done them and Still not successive, then Try the below Simple Tweak to Let your Laptop/PC Sleep As Usual.

Regular Steps at Microsoft KB Recommends these: If not Done, Click This Link

If tried above all, and still not successed Follow this Simple Step, in Hope of Success

All You have to do is, set Computer to Require Password on Wake, and voilà! Sleep Policy is working Hopefully, which worked for me.

See the below Screenshots:

Thanks!


Hey! Guys, Previously I wrote a Post about on How to Recover Gallery Lock Files, that were Locked with the Password and Password is Lost. The Old Post Saved Some of the Irated Patrons by Recovering Files on Moving to a new Location when Extension of the locked files has been changed from .glk to .jpg or user defined Image Extension. Now in this Post I will push you much needed Information on How to Get the Lost Gallery Lock (pro) Password, so that You Don’t have to move Files or play with the Extensions to Recover Locked Media Files.

For this Trick to Work, Your Device Should Be rooted to Access the Sensitive Root Data Location. The Password and Security Question Answer is saved in an XML File in Preferences Folder of Gallery Lock Application, so we will go and open it up and Will Learn Our Own Password Once again from the XML File. Okay! Straight to the Solution;

Go to root Location of your Device, from File Explorer: Use either ES File Explorer or Root Explorer; but be sure the File explorer has the ability to see the Root folder; Means It is Granted root permissions. The recent versions of ES File Explorer has the Root access when You Change the Settings From ->Other Settings in The ->settings Menu and Then -> Root Settings and then Enabling -> Up to Root and -> Root Explorer Options. Or you can use Root Explorer Application alternatively. But here I have used EX File Explorer, So the Interface Options vary If you choose to use Root explorer, However the Navigation and  File Locations Remain Same throughout Procedures.

See the Below Screenshots:

Once You got Rooted Capable File Explorer -> go to -> “/data/data/com.morrison.gallerylock/shared_prefs” folder and then Find the Preferences.XML File naming “com.morrison.gallerylock_preferences.xml” file  Open this XML file as Text and Then Choose Either ES Note Editor or Any Notepad editor If you have installed Separately and scroll down to find the Password you have forgot in there next to “pwd”> and Your Security Answer too.

Note, You cannot change the Password here in XML file and then Put there in Application for newly changed Password, you have to input the Password that has been saved in XML file and Has to input the same into application and then Have to change the Password from the Application, because of Database Interference.

Thanks, Hope this Helps someone in Need.

Chaladi


With this post, you can enable an option to allow sending to bluetooth devices from right clicking a file. A simple tweak to allow sending files to Bluetooth devices directly from file; by right clicking the file without accessing the Bluetooth Sharing option and then back again Clicking on send to button. With this tweak the time can be saved and little comfortable sending files quickly.

To have this work for you, follow these steps in order:

1- Go to Start Menu and Search for Bluetooth File Transfer

2- Right click the Bluetooth File Transfer and Click Properties

3- Click On Go to File Location from the Properties Dialog Box opened

4- Create a Shortcut or Sendto Desktop Button to the File That was being highlighted when Open File Location is accessed

5- Now Type “shell:sendto” in Start Menu Search box and Open that Folder

6- Now copy the File that was sent to Desktop or shortcut created for it and Paste it in Sendto Folder. You can also Access the Same Folder from this location C:\Users\sreekanth’s\AppData\Roaming\Microsoft\Windows\SendTo

In the above File Path, sreekanth’s should be replaced with your computer user name

And Viola! now you can Have the Bluetooth Option enabled in your Right click Menu. You can Rename the File for your Comfort too..

Thanks


Update: This Method Actually Formats the whole capacity and Will require you to restore your IPOD to factory settings. This is for erasing the Games and some stupid content in IPOD, and freeing up Space for mush desired Music and Videos or required

Hey Guys! Now it’s time to wordpress a situation about Ipod Nano being unrecognized in iTunes or/and Windows Explorer, where nothing ahead we can proceed to make use of IPod. For this process to be able to succeed, we need to see the Device partially recognised, means device is Visible in greyed out or hidden like Volume mounted in Windows Explorer, but when tried to access the disk, it says, Please insert a disk, something like that message. this is to format the Whole iPOD and bring out new fresh IPOD. But if you wish to make use of data in the iPOD, just uninstall the drivers for IPOD in Device Manager and Re-install or scan for new hardware changes being installed itunes and connected to internet for better drivers install.

So, how exactly to solve this problem; here it follows. Once you are confident that the volume is recognised, but cannot access the disk either itunes way or volume way in Windows, you have to go to Command Prompt in Windows by pressing Windows+R key together to start a run dialog box and press CMD in there. or type cmd in Start search box and hit enter. Once you are there at the elevated command prompt type the following commands to check whether your iPOD is recognised as a volume disk or not “cd: F:” Pleas note that, here F is the Disk that Ipod has been granted to mount on Windows. It varies as per your system. To make sure what is your Disk name, check the Windows before connecting IpOD and later , to see the newly mounted Disk. Once confirmed that its the only Disk of IPOD, proceed with the given Disk LEtter

if it says the volume is there but not recognised or corrupted, then with the confident that F or the Given Disk letter, Proceed to format the volume disk with the following commands

“format F:”

Once the command is successfully passed onto IPOD Disk, the Formatting option will start formatting the drive with the New EXFAT file system, that will format the drive and will help you recover the iPOD disk back to working in itunes and Windows being recognised.

Hope this help some frustrated Patrons.

Thank you. any further info or queries, happy to help through comments made here.


Update: USB OTG Helper application will solve NTFS formatted USB Drives to be mounted on phone. THis is available in XDA forums only as of yet!


This is to notify the solution for How to fix the external SD cards mounting issues on windows 7 in Jelly bean or related Android OS.

Jelly Bean Home Screen

If you have came from ICS or GB flavors, the probability is that you have used your file exploreres within your Device to see the Exernal SD card (Micro SD here) and Internal sd card (USB Storage) in an easy ways, representing external Sd card folder and usb storage folders in their respective denomination; an easy navigation, not much confusion isn’t it?.

But ever since JB arrived, the storage devices location are little changed; perhaps accurate this time if get used to; are mounted in “/storage” path as /sdcard0 representing internal USB storage space and /sdcard1 representing microsd card
Another path /USBdisk is for the OTG (On the GO USB cable attached flash drives can be seen there in this path folder.) natively supports FAT/FAT32 formatted USB Flash drives, if NTFS support is needed, try you luck with NTFS Mounter. So, since this path has been changed, some already existing Softlinks (shortcuts in windows context) target to that sdcards.

I can put down a lot of words here, but the solution is important however; for most people, so confining with thus stated information. Since the above mentioned words help for some people who are looking for sdcard locations within their Phone; who confused seeing the external sd card folder empty :-0.
So how to fix mounting issues in windows 8, 7 or Vista is, here: just install Multi Mount SD card from Market or from your known sources and that’s it. You will see the sd cards mounted on your PC and at the same time you can access SD cards on your Phone as well. Try not use the Other methods, when using Multi Mount SD method. use Widget on your screen to activate and deactivate application aka Mounting and Unmounting Disk drives.

Hope this helps some irated patrons.